Android Global View Style에 대한 정리
프론트엔드/모바일 앱에서 디자인은 매우 중요한 요소입니다. 디자인의 차이로 서비스의 아이덴티를 전달할 수 있으며, 서비스의 품질이 더 올라갈 수 있습니다. 또한, 사용자를 서비스에 Lock-In 할 수 있는 효과까지 얻을 수 있습니다. 그렇기에 서비스에서 제품에서 사용되는 컴포넌트마다 동일한 디자인 스타일을 적용하는 것은 당연한 이야기입니다.
본 글에서는 Android에서 Global(=Common) View Style 적용 방법에 대해서 이야기해보려고 합니다.
[기본편] Style 적용
실제 적용하기 전 알아야 할 기본적인 스타일 적용 방법에 대한 이론을 학습해보기로 합니다.
Android에서 스타일을 적용하는 방법에는 3가지가 있습니다. Theme, Style, Attribute 이렇게 3가지로 Theme > Style > Attribute 이렇게 적용되는 범위가 다릅니다.
Theme
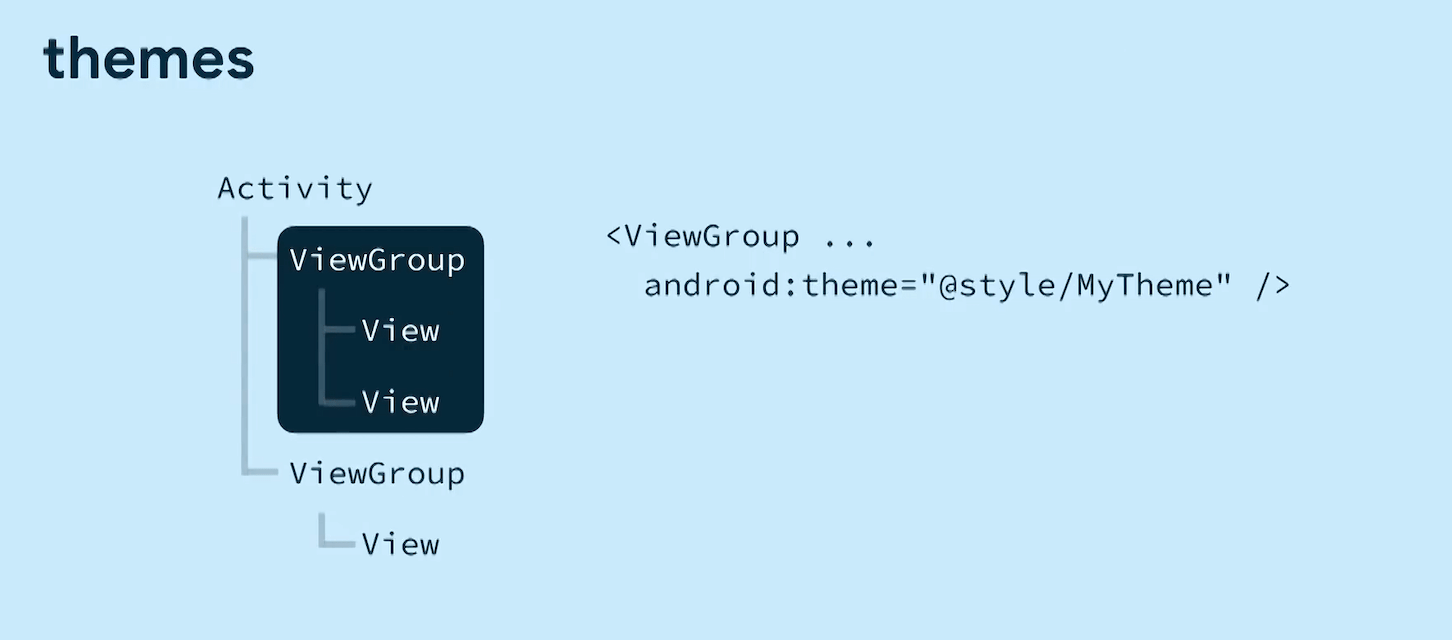
Theme는 스타일을 적용하는 방법 중 가장 넓게 적용됩니다. 적용하는 곳과 하위에 내포하는 뷰 모두 적용됩니다. 그리고 복수의 Style과 Attribute 정보를 함께 정의도 가능합니다.
Theme는 Application, Activity, ViewGroup, View에 적용할 수 있습니다.
- Application Theme : https://developer.android.com/guide/topics/manifest/application-element#theme
- Activity Theme : https://developer.android.com/guide/topics/manifest/activity-element#theme
- ViewGroup / View Theme : https://developer.android.com/reference/android/view/View#themes
LinearLayout, FrameLayout 등과 같은 ViewGroup이 아니라 TextView, EditText와 같은 View를 상속한 단일 뷰에 Theme 적용은 Style 적용과 차이점은 없습니다.
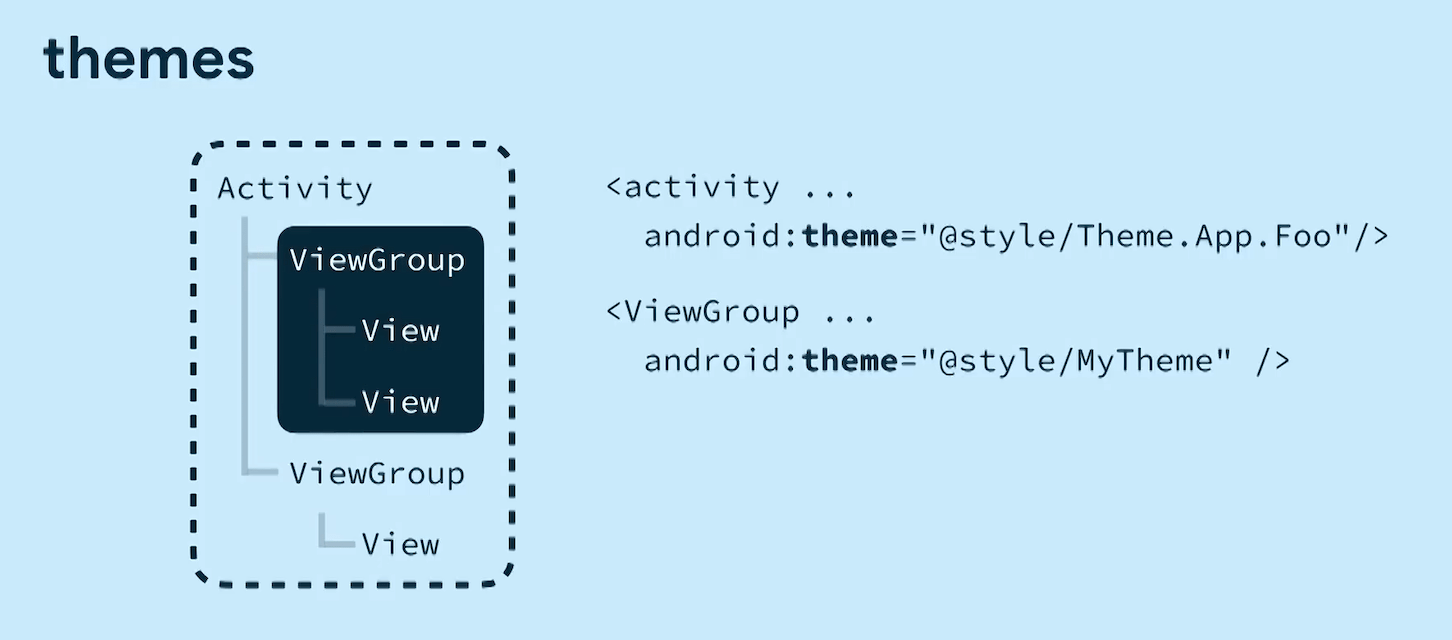
Theme를 적용할 수 있는 곳은 Style, Attribute와는 다르게 Application과 Activity에 적용할 수 있습니다. 이 기능을 통해서 앱 전체 혹은 테마를 적용한 화면에 동일한 디자인을 적용할 수 있습니다
기본 Theme 적용
Theme를 사용하는 방법은 res/themes.xml에 자신이 원하는 Theme 정보를 정의한 후에 원하는 곳에 적용하면 됩니다. 다음은 Google I/O Android 앱에서 사용하는 Theme 정보입니다.
<resources>
  <style name="Base.AppTheme" parent="Theme.MaterialComponents.DayNight.NoActionBar">
      <!-- Customize your theme here. -->
      <item name="colorPrimary">@color/color_primary</item>
      <item name="colorPrimaryDark">@color/color_primary_dark</item>
      <item name="colorSecondary">?attr/colorPrimary</item>
      <item name="colorOnSecondary">@color/color_on_secondary</item>
      <item name="colorControlLight">@color/color_control_light</item>
      <item name="colorSurfaceSecondary">@color/color_surface_secondary</item>

      <!-- Window decor -->
      <item name="android:windowLightStatusBar" tools:targetApi="m">@bool/use_light_status</item>
      <item name="android:statusBarColor">@color/transparent</item>
      <item name="android:windowLightNavigationBar" tools:targetApi="o_mr1">@bool/use_light_navigation</item>
      <item name="android:navigationBarColor">@color/nav_bar_scrim</item>

      <!-- Widget styles -->
      <item name="toolbarStyle">@style/Widget.IOSched.Toolbar</item>
      <item name="tabStyle">@style/Widget.IOSched.Tabs</item>
      <item name="navigationViewStyle">@style/Widget.IOSched.NavigationView</item>

      <!-- Text appearances -->
      <item name="textAppearanceBody2">@style/TextAppearance.IOSched.Body2</item>
      <item name="textAppearanceButton">@style/TextAppearance.IOSched.Button</item>
      <item name="textAppearanceListItem">@style/TextAppearance.IOSched.ListPrimary</item>

      <!-- Dialogs -->
      <item name="materialAlertDialogTheme">@style/AlertDialog.Theme</item>

      <!-- Custom theme attrs -->
      <item name="ioschedNavigationBarDividerColor">?attr/colorControlLight</item>
      <item name="sessionListKeyline">@dimen/session_keyline</item>
      <item name="eventCardHeaderBackground">@color/event_card_header_background</item>
  </style>

  <style name="AppTheme" parent="Base.AppTheme" />
</resources>
출처 : https://github.com/google/iosched/blob/master/mobile/src/main/res/values/themes.xml
예시를 통해서 우리는 Theme에서 Style, Attribute 속성을 재정의할 수 있다는 것을 알 수 있습니다.
<manifest ...>
    ...
    <application
        ...
        android:theme="@style/AppTheme">
        <activity
            ...
            android:theme="@style/AppTheme.Launcher">
            ...
         </activity>
    </application>
</manifest>
출처 : https://github.com/google/iosched/blob/master/mobile/src/main/AndroidManifest.xml#L32
또한, Google I/O 앱에서는 Base.AppTheme으로 정의한 기본 테마를 AppTheme 테마가 상속받은 후에 Application과 Activity에 필요한 개별 테마에서 사용됩니다.
Theme.AppCompat 은 어디에서 왔을까?
현재 Android 개발에서 Material Design 테마를 사용하지 않는 경우에는 대부분 Theme.AppCompat 을 기본 테마로 지정하고 사용하고 있습니다. Theme.AppCompat는 AndroidX의 AppCompat에 포함되어 있습니다.
<resources>
    ...
    <!-- Platform-independent theme providing an action bar in a dark-themed activity. -->
    <style name="Theme.AppCompat" parent="Base.Theme.AppCompat" />
    ...
</resources>
출처 : https://android.googlesource.com/platform/frameworks/support/+/refs/heads/androidx-master-dev/appcompat/appcompat/src/main/res/values/themes.xml#32
그리고, Theme.AppCompat 또한 Base.Theme.AppCompat 을 부모 테마로 사용하는 것을 알 수 있습니다. Android에서 Compat으로 끝나는 이름을 가지는 Theme, Class, File 등은 Android의 발전으로 통해서 생겨난 정보를 호환하는 역할을 담당합니다.
실제로 Base.Theme.AppCompat 은 하나의 Theme로 정의되어 있지만, 호환성을 확보하기 위해서 버전마다 다양한 형태로 정의되어 있습니다.
<!-- Default -->
<!-- https://android.googlesource.com/platform/frameworks/support/+/refs/heads/androidx-master-dev/appcompat/appcompat/src/main/res/values/themes_base.xml#522 -->
<style name="Base.Theme.AppCompat" parent="Base.V7.Theme.AppCompat"></style>

<!-- v21 -->
<!-- https://android.googlesource.com/platform/frameworks/support/+/refs/heads/androidx-master-dev/appcompat/appcompat/src/main/res/values-v21/themes_base.xml#56 -->
<style name="Base.Theme.AppCompat" parent="Base.V21.Theme.AppCompat" />

<!-- v22 -->
<!-- https://android.googlesource.com/platform/frameworks/support/+/refs/heads/androidx-master-dev/appcompat/appcompat/src/main/res/values-v22/themes_base.xml#20 -->
<style name="Base.Theme.AppCompat" parent="Base.V22.Theme.AppCompat" />

<!-- v23 -->
<!-- https://android.googlesource.com/platform/frameworks/support/+/refs/heads/androidx-master-dev/appcompat/appcompat/src/main/res/values-v23/themes_base.xml#20 -->
<style name="Base.Theme.AppCompat" parent="Base.V23.Theme.AppCompat" />

<!-- v26 -->
<!-- https://android.googlesource.com/platform/frameworks/support/+/refs/heads/androidx-master-dev/appcompat/appcompat/src/main/res/values-v26/themes_base.xml#20 -->
<style name="Base.Theme.AppCompat" parent="Base.V26.Theme.AppCompat" />

<!-- v28 -->
<!-- https://android.googlesource.com/platform/frameworks/support/+/refs/heads/androidx-master-dev/appcompat/appcompat/src/main/res/values-v28/themes_base.xml#20 -->
<style name="Base.Theme.AppCompat" parent="Base.V28.Theme.AppCompat" />
본 글을 작성하는 시간을 기점으로 Base.Theme.AppCompat은 총 6개의 형태로 정의되어 있습니다. 또한 각 버전마다 호환성을 확보하기 위해 별도 부모를 가진 것을 알 수 있습니다. 실제로 앱에서 사용하는 버전에 따라서 가장 가까운 하위 버전의 테마를 사용합니다.
Material Theme는 AppCompat과 다른 형태를 취합니다.
<style name="Theme.Material">
   ...
</style>
출처 : https://android.googlesource.com/platform/frameworks/base/+/master/core/res/res/values/themes_material.xml
Style
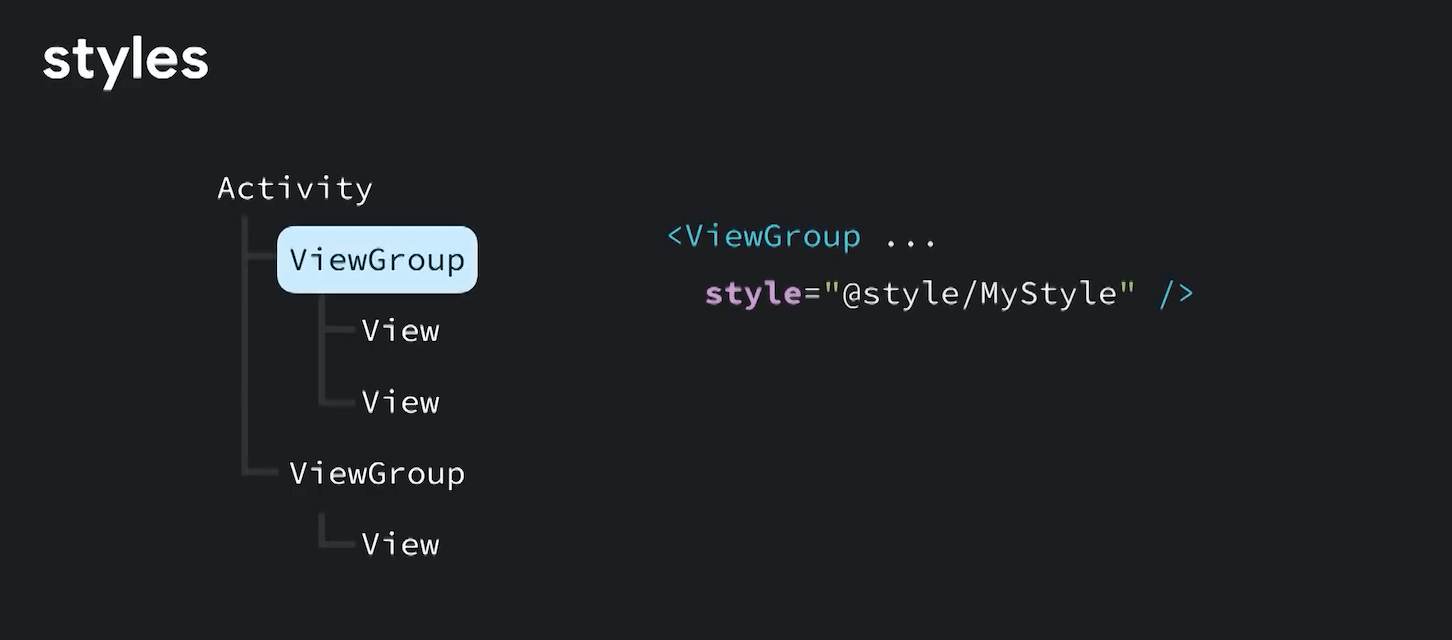
Style은 복수의 Attribute 정보를 정의한 후 적용하는 방법입니다. Style은 Theme와 다르게 하나의 View에만 적용됩니다.
Style를 사용하는 방법은 res/styles.xml에 자신이 원하는 Style 정보를 정의한 후에 원하는 곳에 적용하면 됩니다. 다음은 Google I/O Android 앱에서 사용하는 Style 정보입니다.
<style name="Widget.IOSched.Feed.Session.Title">
    <item name="android:ellipsize">end</item>
    <item name="android:maxLines">3</item>
    <item name="android:textSize">18sp</item>
    <item name="fontFamily">sans-serif</item>
    <item name="android:fontFamily">sans-serif</item>
</style>
출처 : https://github.com/google/iosched/blob/master/mobile/src/main/res/values/styles.xml#L296
Style은 View/ViewGroup에 style attribute을 사용해서 적용할 수 있습니다.
<TextView
    ...
    style="@style/Widget.IOSched.Feed.Session.Title"
    ... />
출처 : https://github.com/google/iosched/blob/master/mobile/src/main/res/layout/item_feed_session.xml#L97
TextView에 Widget.IOSched.Feed.Session.Title 스타일을 적용함으로써 ellipsize/maxLines/textSize/fontFamily 속성이 반영됩니다.
Theme vs Style
앞서 언급한 Theme와 Style 적용 범위의 차이는 아래와 같습니다.
| Style | Theme |
|---|---|
 |
 |
 |
Attribute
Attribute는 단일 속성 변경입니다. 많이 사용되는 예로는 TextView 사용 시 android:textColor="..." 와 같은 형태입니다. 이 항목은 다른 속성에 영향을 주지 않으며 재정의할 속성만을 선택해서 변경합니다.
Style 우선순위
지금까지 Style 적용에 필요한 3가지 방법을 언급했습니다. Theme, Style, 사용자 지정 Attribute입니다.
Attribute > Style > Theme 순으로 우선순위가 높습니다.
우선 순위 여부에 따라서 지정한 스타일 속성이 적용됩니다.
[Global View] Style 적용
Global View을 적용하는 방법은 프로젝트와 작업자마다 다양한 방법이 있습니다. 이 섹션에서는 지금까지 언급한 항목 중에서 Theme와 Style을 사용하는 방법을 사용합니다. 일반적인 방법이지만, 전체 적용을 좀 더 쉽게 할 수 있습니다.
첫 시작은 기본 Style/Color 정의
Global View Style에서 먼저 선행되어야 할 작업은 Style과 Color를 정의하는 것입니다. Theme와 Style에 공통을 적용하더라도 기본 값에 대한 정의는 필수 사항입니다.
상세한 정의는 이후의 TextView/EditText/Button에서 다시 언급하겠습니다. Theme에 적용되는 Style/Attribute가 어떤 결과로 View에 적용되는지 살펴보겠습니다.
TextView Global Style
TextView를 앱 전체에 동일한 Style을 적용하는 방법에는 textColor, textViewStyle 등이 있습니다.
<!-- res/themes.xml -->
<style name="BaseTheme.Styled">
    <!-- TextView TextColor -->
    <item name="android:textColor">@color/selector_default_textview</item>
    <!-- TextView Style -->
    <item name="android:textViewStyle">@style/MyTextStyle</item>
</style>

<!-- color/selector_default_textview.xml-->
<selector xmlns:android="http://schemas.android.com/apk/res/android">
    <item android:color="@color/google_red" android:state_enabled="false" />
    <item android:color="@color/google_blue" />
</selector>

<!-- res/styles.xml -->
<style name="MyTextStyle" parent="Widget.AppCompat.TextView">
    <item name="android:background">@drawable/bg_text_view</item>
    <item name="android:gravity">center</item>
    <item name="android:textSize">20sp</item>
    <item name="android:textStyle">bold</item>
</style>

<!-- drawable/bg_text_view.xml -->
<shape xmlns:android="http://schemas.android.com/apk/res/android"
    android:shape="rectangle">
    <stroke
        android:width="1dp"
        android:color="#CCC" />
    <corners android:radius="12dp" />
    <padding
        android:bottom="4dp"
        android:left="12dp"
        android:right="12dp"
        android:top="4dp" />
</shape>
위 예제에서는 Theme에 textColor 와 textViewStyle 을 사용한 모습입니다. 적용한 속성과 스타일에 대한 자세한 내용은 다음과 같습니다.
- textColor : Enable / Disable
- textViewStyle
- background : Border가 회색인 둥근 사각형
- gravity : 가운데 정렬
- textSize : 20sp
- textStyle : bold
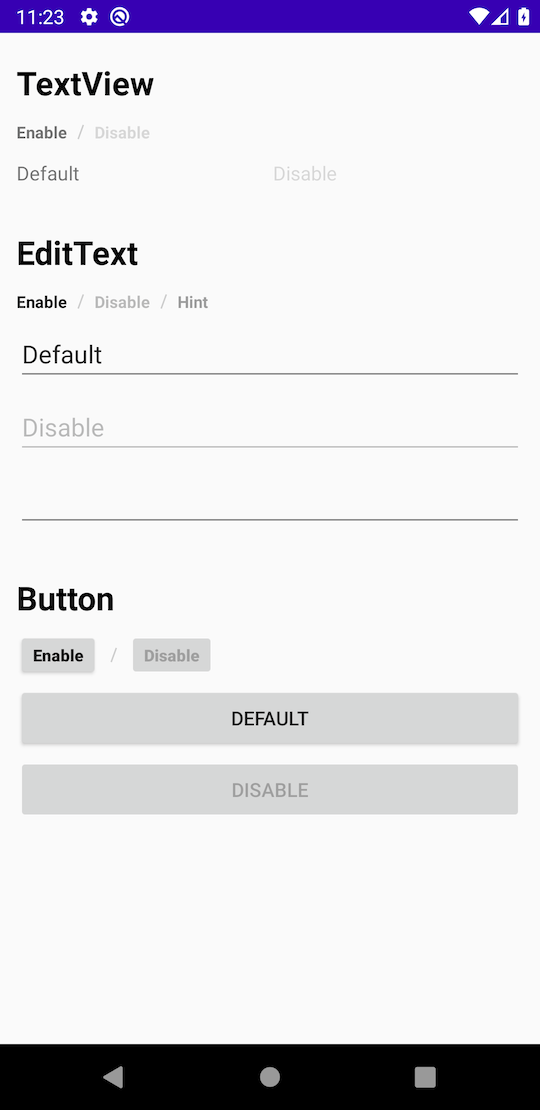
TextView의 Global Style을 적용한 모습입니다.
| Style 적용 전 | Style 적용 후 |
|---|---|
 |
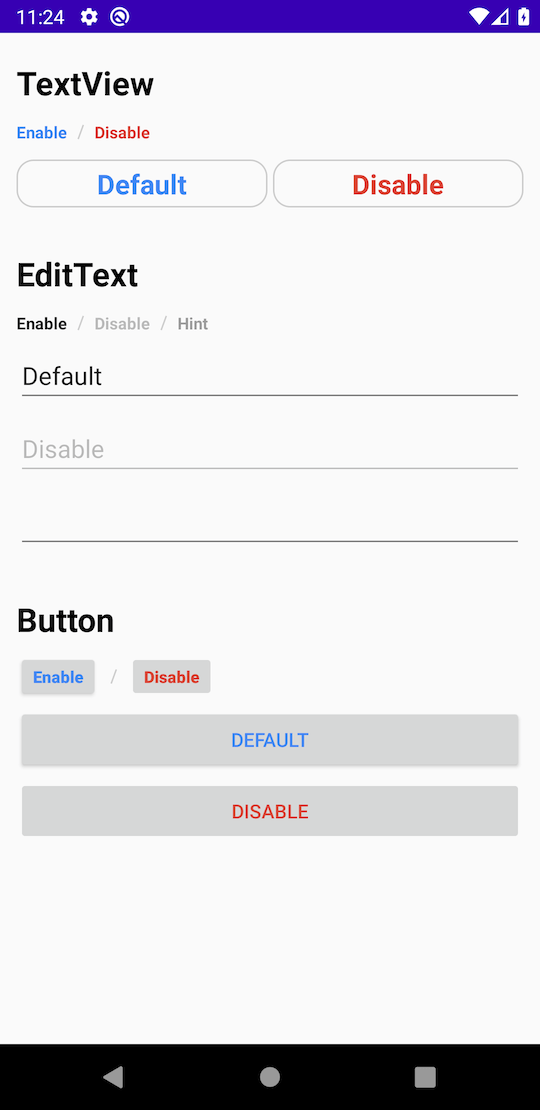 |
textColor 와 textViewStyle 두 가지의 속성이 각각 다양한 곳에 적용되었습니다.
- textColor : TextView, Button
- textViewStyle : TextView
textColor 속성이 Button에도 적용이 가능하다는 것을 확인했습니다. 해당 내용의 적용에 대해서는 이후에 별도 항목에서 살펴보겠습니다. 지금은 TextView와 Button에 적용된다는 현상만 알고 넘어가겠습니다.
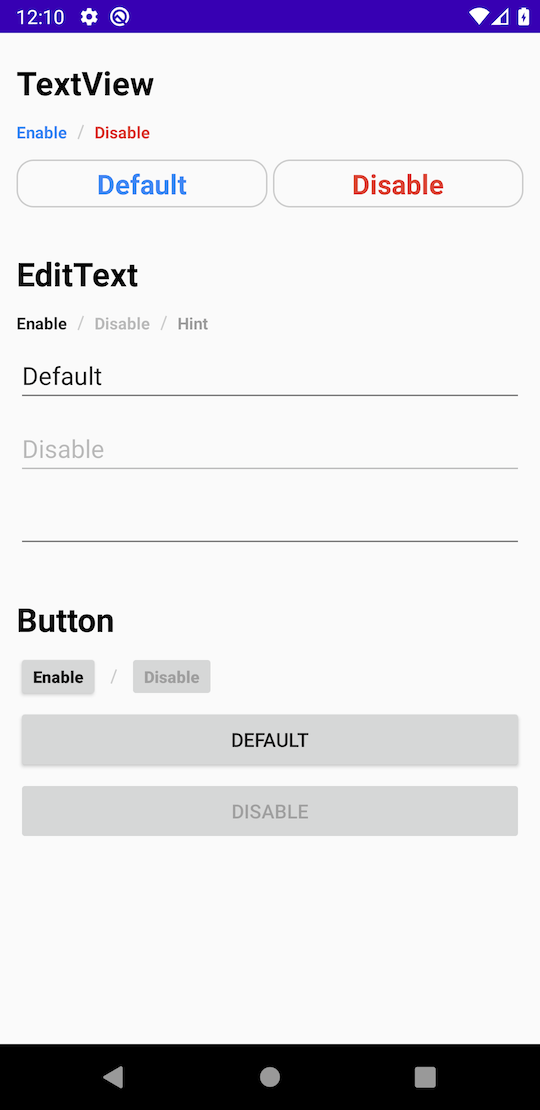
만약, TextView에만 Style을 적용하고 싶은 경우에는 textViewStyle 내부에 textColor를 별도로 지정하는 방법으로 위 케이스는 해결이 가능합니다.
<!-- res/themes.xml -->
<style name="BaseTheme.Styled">
    <!-- TextView Style -->
    <item name="android:textViewStyle">@style/MyTextStyle</item>
</style>

<!-- res/styles.xml -->
<style name="MyTextStyle" parent="Widget.AppCompat.TextView">
    <item name="android:background">@drawable/bg_text_view</item>
    <item name="android:gravity">center</item>
    <item name="android:textColor">@color/selector_default_textview</item>
    <item name="android:textSize">20sp</item>
    <item name="android:textStyle">bold</item>
</style>
TextViewStyle 내부에 TextColor 적용한 모습은 아래와 같습니다.
| Style 적용 전 | Style 적용 후 |
|---|---|
 |
 |
EditText Global Style
EditText를 앱 전체에 동일한 Style을 적용하는 방법에는 editTextColor, editTextStyle 등이 있습니다.
<!-- res/themes.xml -->
<style name="BaseTheme.Styled">
    <!-- Hint Color -->
    <item name="android:textColorHint">@color/text_hint</item>
    <!-- EditText TextColor -->
    <item name="android:editTextColor">@color/selector_default_edittext</item>
    <!-- EditText Background -->
    <item name="android:editTextBackground">@drawable/bg_edit_text_view</item>
    <!-- EditText Style -->
    <item name="editTextStyle">@style/MyEditTextStyle</item>
</style>

<!-- color/selector_default_edittext.xml -->
<selector xmlns:android="http://schemas.android.com/apk/res/android">
    <item android:color="@color/edittext_disable" android:state_enabled="false" />
    <item android:color="@color/edittext_default" />
</selector>

<!-- drawable/bg_edit_text_view.xml -->
<shape xmlns:android="http://schemas.android.com/apk/res/android"
    android:shape="rectangle">
    <stroke
        android:width="1dp"
        android:color="@color/google_blue" />
    <corners android:radius="12dp" />
    <padding
        android:bottom="4dp"
        android:left="12dp"
        android:right="12dp"
        android:top="4dp" />
</shape>

<!-- res/styles.xml -->
<style name="MyEditTextStyle" parent="Widget.AppCompat.EditText">
    <item name="android:hint">Please Input...</item>
    <item name="android:textSize">20sp</item>
</style>
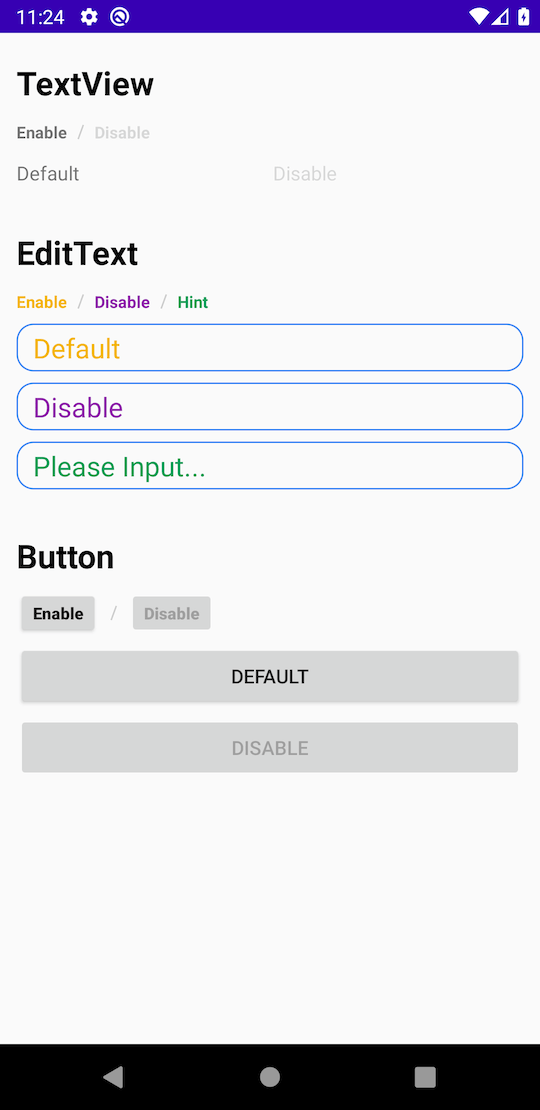
위 예제에서는 Theme에 textColorHint, editTextColor, editTextBackground, editTextStyle 을 사용한 모습입니다. 적용한 속성과 스타일에 대한 자세한 내용은 다음과 같습니다.
- textColorHint : Text Hint Color
- editTextColor : Enable / Disable
- editTextBackground
- background : Border가 파란색인 둥근 사각형
- editTextStyle
- hint : 기본 Hint 문구를 “Please Input…“로 지정
- textSize : 20sp
EditText의 Global Style을 적용한 모습입니다.
| Style 적용 전 | Style 적용 후 |
|---|---|
 |
 |
Button Global Style
Button의 Global View Style 적용은 Theme의 textColor 속성을 이용해서 적용도 가능합니다. 그러나, background color를 더 자유롭게 하고 싶은 경우가 많기 때문에, Button에서는 공통 textColor 대신 buttonStyle의 textColor를 이용해서 Button의 textColor를 적용합니다.
<!-- res/themes.xml -->
<style name="BaseTheme.Styled">
    <!-- Button Style -->
    <item name="android:buttonStyle">@style/MyButtonStyle</item>
</style>

<!-- color/selector_default_edittext.xml -->
<selector xmlns:android="http://schemas.android.com/apk/res/android">
    <item android:color="@color/edittext_disable" android:state_enabled="false" />
    <item android:color="@color/edittext_default" />
</selector>

<!-- res/styles.xml -->
<style name="MyButtonStyle" parent="Widget.AppCompat.Button">
    <item name="android:textColor">@color/selector_default_button</item>
    <item name="android:textSize">20sp</item>
    <item name="backgroundTint">@color/selector_default_button_bg</item>
</style>

<!-- color/selector_default_button.xml -->
<selector xmlns:android="http://schemas.android.com/apk/res/android">
    <item android:color="@color/button_disable" android:state_enabled="false" />
    <item android:color="@color/button_default" />
</selector>

<!-- color/selector_default_button_bg.xml -->
<selector xmlns:android="http://schemas.android.com/apk/res/android">
    <item android:color="@color/button_disable_bg" android:state_enabled="false" />
    <item android:color="@color/button_default_bg" />
</selector>
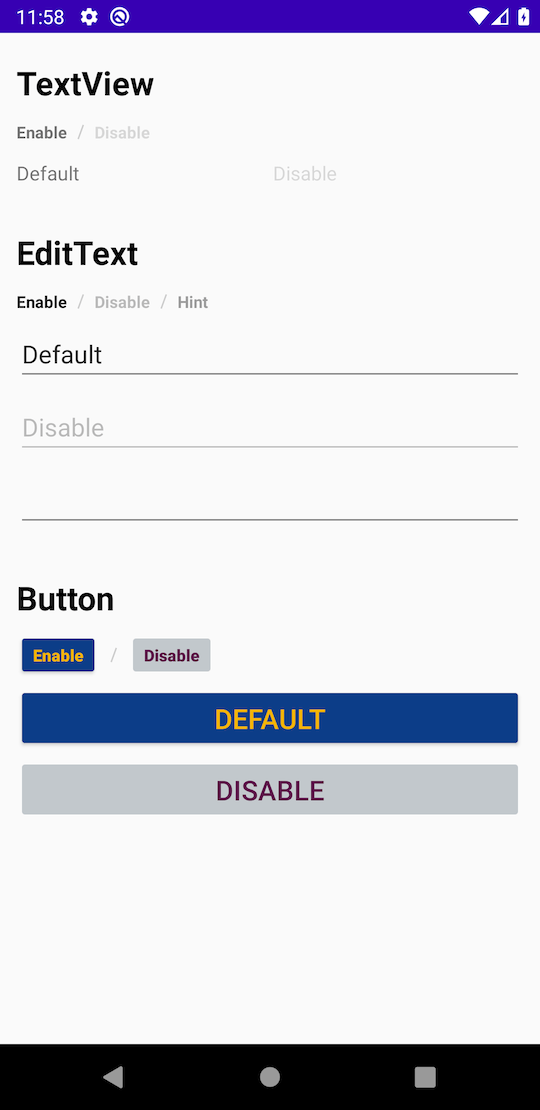
위 예제에서는 Theme에 buttonStyle 을 사용한 모습입니다. 적용한 속성과 스타일에 대한 자세한 내용은 다음과 같습니다.
- buttonStyle
- textColor : Enable / Disable
- textSize : 20sp
- backgroundTint : Enable / Disable
Button의 Global Style을 적용한 모습입니다.
| Style 적용 전 | Style 적용 후 |
|---|---|
 |
 |
번외 편 1.하나의 속성이 복수 위치에 반영되는 이유
🚧🚧🚧 해당 내용은 오류가 있을 수 있습니다. 🚧🚧🚧
TextView의 Global Style을 적용 시 textColor 속성이 TextView와 Button 2곳에 적용된 것을 확인했습니다. 여기에서는 어떻게 2곳의 View Component가 변경되었는지를 살펴보겠습니다.

TextView의 textColor
기본적인 TextView의 textColor의 정의는 textAppearanceSmall에서 스타일이 결정됩니다. 사용자가 Theme에서 textColor를 직접 정의한 경우, textAppearanceSmall의 textColor가 재정의됩니다. 또한, Theme에 textColorTertiary값을 별도로 정의한다면, textAppearanceSmall가 스타일로 결정될 때에 textColor의 값으로 사용됩니다.
<!-- TextView - AppCompat -->
<style name="Widget.AppCompat.TextView" parent="Base.Widget.AppCompat.TextView"/>
<style name="Base.Widget.AppCompat.TextView" parent="android:Widget.TextView"/>
<style name="Widget.TextView">
    <item name="textAppearance">?attr/textAppearanceSmall</item>
    ...
</style>
<style name="Base.TextAppearance.AppCompat.Small">
    <item name="android:textSize">@dimen/abc_text_size_small_material</item>
    <item name="android:textColor">?android:attr/textColorTertiary</item> // ◀ TextColor
</style>

<!-- TextView - Material Design -->
<style name="Widget.AppCompat.TextView" parent="Base.Widget.AppCompat.TextView"/>
<style name="Base.Widget.AppCompat.TextView" parent="android:Widget.Material.TextView">
    ...
</style>
<style name="Widget.Material.TextView" parent="Widget.TextView"/>
<style name="Widget.TextView">
    <item name="textAppearance">?attr/textAppearanceSmall</item>
    ...
</style>
<style name="Theme.Material.Light" parent="Theme.Light">
    <item name="textAppearanceSmall">@style/TextAppearance.Material.Small</item>
</style>
<style name="TextAppearance.Material.Small">
    <item name="textSize">@dimen/text_size_small_material</item>
    <item name="textColor">?attr/textColorTertiary</item> // ◀ TextColor
</style>
EditText의 textColor
EditText의 TextColor는 TextView의 textColor 대신 editTextColor를 사용했습니다. 아래의 플랫폼, AndroidX 소스를 확인해보면 AppCompat과 Material Design의 EditText 스타일에서 textAppearance 스타일 대신 textColor를 재정의하고 있습니다. 그리고 재정의한 textColor 속성에서 editTextColor값을 찾는 것을 알 수 있습니다.
<!-- EditText - AppCompat -->
<style name="Widget.AppCompat.EditText" parent="Base.Widget.AppCompat.EditText"/>
<style name="Base.Widget.AppCompat.EditText" parent="Base.V7.Widget.AppCompat.EditText"/>
<style name="Base.V7.Widget.AppCompat.EditText" parent="android:Widget.EditText">
    <item name="android:textColor">?attr/editTextColor</item>
    <item name="android:textAppearance">?android:attr/textAppearanceMediumInverse</item>
    ...
</style>

<!-- EditText - Material Design -->
<style name="Widget.AppCompat.EditText" parent="Base.Widget.AppCompat.EditText"/>
<style name="Base.Widget.AppCompat.EditText" parent="android:Widget.Material.EditText"/>
<style name="Widget.Material.EditText" parent="Widget.EditText"/>
<style name="Widget.EditText">
    <item name="textAppearance">?attr/textAppearanceMediumInverse</item>
    <item name="textColor">?attr/editTextColor</item>
    ...
</style>
Button의 textColor
Button 또한 TextView와 동일하게 textAppearance를 통해서 텍스트 컬러를 정의하고 있습니다. textAppearance의 스타일에서 textColor를 정의한 값을 사용하고 있으므로 Theme에 정의한 textColor가 Button에도 적용됩니다.
<!-- Button - AppCompat -->
<style name="Widget.AppCompat.Button" parent="Base.Widget.AppCompat.Button"/>
<style name="Base.Widget.AppCompat.Button" parent="android:Widget">
    <item name="android:textAppearance">?android:attr/textAppearanceButton</item>
    ...
</style>
<style name="Base.V7.Theme.AppCompat.Light" parent="Platform.AppCompat.Light">
    <item name="android:textAppearanceButton">@style/TextAppearance.AppCompat.Widget.Button</item>
</style>
<style name="TextAppearance.AppCompat.Widget.Button" parent="Base.TextAppearance.AppCompat.Widget.Button" />
<style name="Base.TextAppearance.AppCompat.Widget.Button" parent="TextAppearance.AppCompat.Button" />
<style name="TextAppearance.AppCompat.Button" parent="Base.TextAppearance.AppCompat.Button" />
<style name="Base.TextAppearance.AppCompat.Button">
    <item name="android:textColor">?android:textColorPrimary</item>
    ...
</style>

<!-- Button - Material Design -->
<style name="Widget.AppCompat.Button" parent="Base.Widget.AppCompat.Button"/>
<style name="Base.Widget.AppCompat.Button" parent="android:Widget.Material.Button"/>
<style name="Widget.Material.Button">
    <item name="textAppearance">?attr/textAppearanceButton</item>
    ...
</style>
<style name="Theme.Material.Light" parent="Theme.Light">
    <item name="textAppearanceButton">@style/TextAppearance.Material.Widget.Button</item>
</style>
<style name="TextAppearance.Material.Widget.Button" parent="TextAppearance.Material.Button" />
<style name="TextAppearance.Widget.Button" parent="TextAppearance.Small.Inverse">
    <item name="textColor">@color/primary_text_light_nodisable</item>
</style>
Platform / AndroidX 소스 출처
- https://android.googlesource.com/platform/frameworks/support/+/androidx-master-dev/appcompat/appcompat/src/main/res/values/styles.xml
- https://android.googlesource.com/platform/frameworks/support/+/androidx-master-dev/appcompat/appcompat/src/main/res/values/styles_base_text.xml
- https://android.googlesource.com/platform/frameworks/support/+/androidx-master-dev/appcompat/appcompat/src/main/res/values/themes.xml
- https://android.googlesource.com/platform/frameworks/base/+/master/core/res/res/values/styles.xml
- https://android.googlesource.com/platform/frameworks/base/+/master/core/res/res/values/styles_material.xml
- https://android.googlesource.com/platform/frameworks/base/+/master/core/res/res/values/themes_material.xml
번외 편 2) 4.x 호환은 다소 까다롭습니다
앞서 TextView/EditText/Button의 Global Style을 적용하는 방법을 알아봤습니다. 지금까지 나열한 Theme는 아래와 같습니다.
<style name="BaseTheme.Styled">
    <!-- TextView TextColor -->
    <item name="android:textColorTertiary">@color/selector_default_textview</item>
    <!-- Hint Color -->
    <item name="android:textColorHint">@color/text_hint</item>
    <!-- EditText TextColor -->
    <item name="android:editTextColor">@color/selector_default_edittext</item>
    <!-- EditText Background -->
    <item name="android:editTextBackground">@drawable/bg_edit_text_view</item>
    <!-- TextView Style -->
    <item name="android:textViewStyle">@style/MyTextStyle</item>
    <!-- EditText Style -->
    <item name="editTextStyle">@style/MyEditTextStyle</item>
    <!-- Button Style -->
    <item name="android:buttonStyle">@style/MyButtonStyle</item>
<style>
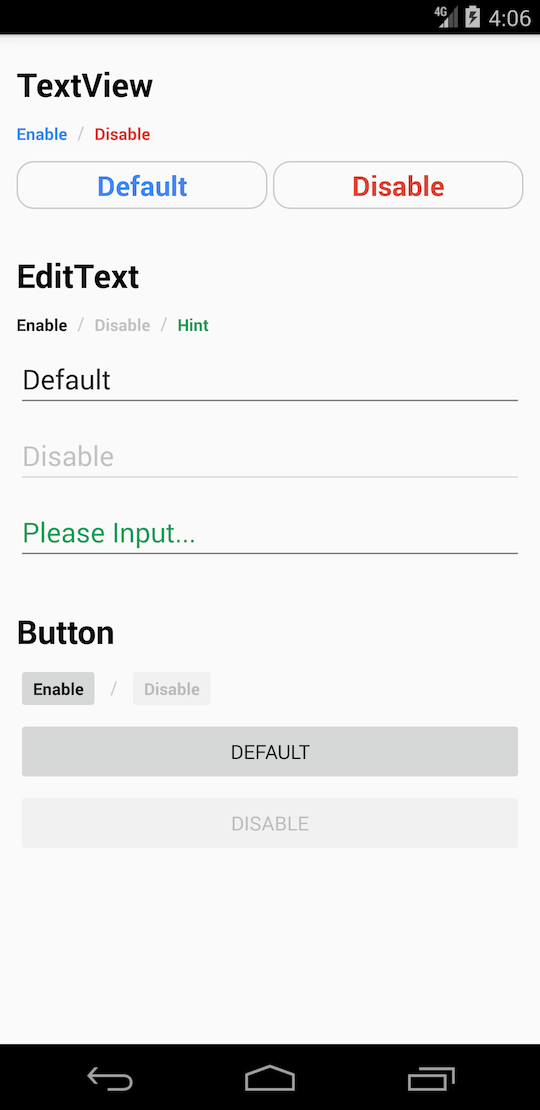
위 Theme 정보를 Android 4.4.2와 Android 9.0에 적용 시 아래와 같은 화면을 얻을 수 있습니다.
| 4.4.2 | 9.0 |
|---|---|
 |
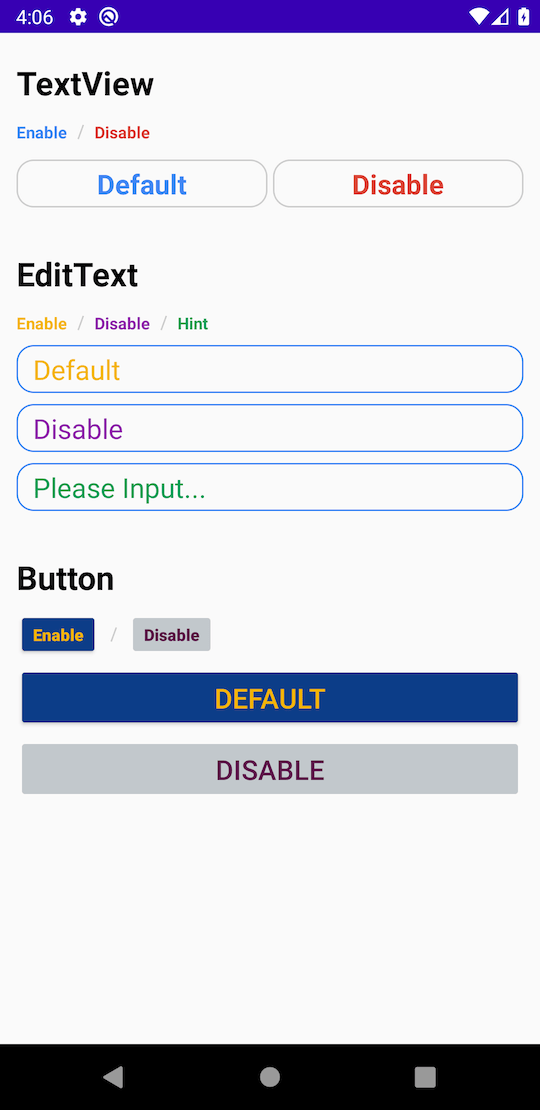 |
적용한 Theme의 비교 이미지를 확인했을 때 일부 Style이 4.X 버전에서 적용되지 않고 있습니다.
- android:editTextColor
- android:editTextBackground
- android:buttonStyle
해당 스타일은 5.0+ 에서만 제대로 적용됩니다.
editTextColor, editTextBackground, buttonStyle에서 android namespace를 제거했을 때 Android 4.4.2에 적용이 됩니다.
Support 4.4.2+ Theme
editTextColor, editTextBackground, buttonStyle Style 반영 문제를 해결한 Theme 정보는 아래와 같습니다.
<style name="BaseTheme.Styled">
    <!-- TextView TextColor -->
    <!-- Support 4.4.2+ -->
    <item name="android:textColorTertiary">@color/selector_default_textview</item>

    <!-- Hint Color -->
    <!-- Support 4.4.2+ -->
    <item name="android:textColorHint">@color/text_hint</item>

    <!-- EditText TextColor -->
    <!-- Support 5.0+ -->
    <item name="android:editTextColor">@color/selector_default_edittext</item>
    <!-- Support 4.4.2 -->
    <item name="editTextColor">@color/selector_default_edittext</item>

    <!-- EditText Background -->
    <!-- Support 5.0+ -->
    <item name="android:editTextBackground">@drawable/bg_edit_text_view</item>
    <!-- Support 4.4.2 -->
    <item name="editTextBackground">@drawable/bg_edit_text_view</item>

    <!-- TextView Style -->
    <!-- Support 4.4.2+ -->
    <item name="android:textViewStyle">@style/MyTextStyle</item>

    <!-- EditText Style -->
    <!-- Support 4.4.2+ -->
    <item name="editTextStyle">@style/MyEditTextStyle</item>

    <!-- Button Style -->
    <!-- Support 5.0+ -->
    <item name="android:buttonStyle">@style/MyButtonStyle</item>
    <!-- Support 4.4.2+ -->
    <item name="buttonStyle">@style/MyButtonStyle</item>
<style>
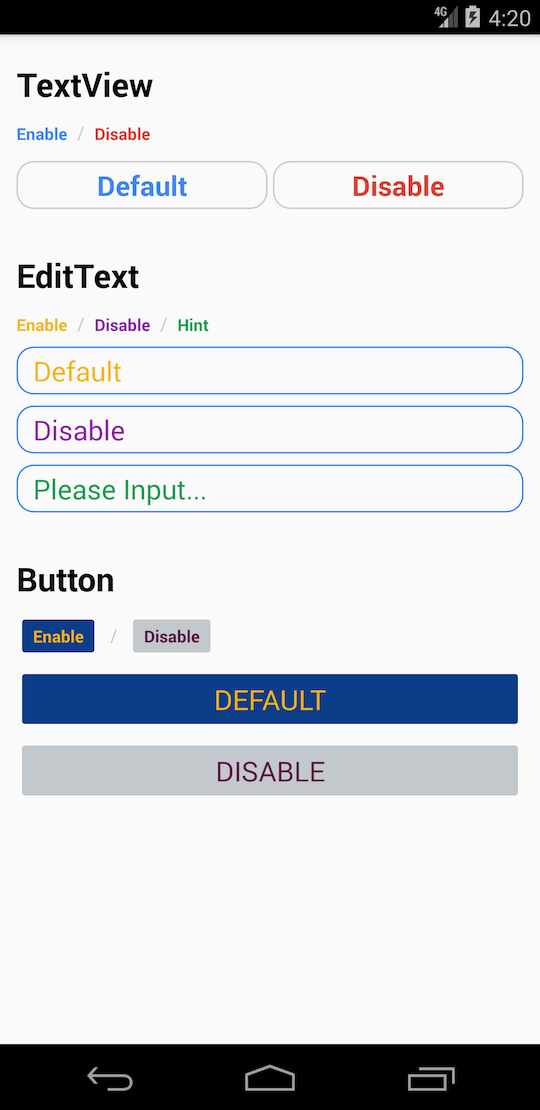
또한 수정된 Theme를 사용해서 Android 4.4.2 / Android 9.0에 적용 시 동일한 모습을 볼 수 있습니다.
| Fixed Theme / 4.4.2 | 9.0 |
|---|---|
 |
 |
Theme 관련 Style/Attirbute 중에는 4.x 버전에만 적용, 5.0 이상 적용, 모든 버전 적용 등 다양한 형태가 있습니다. 그렇기에 Theme 적용 시에는 4.x, 5.0 이상 버전 등 다양한 버전에 대한 UI 테스트를 해야 합니다.
아쉽게도 이런 Style에 대한 정의가 공식 문서에도 없는 것이 매우 아쉽습니다.
번외 편 3) Theme 사용 시의 트러블슈팅
1. Style의 부모 선언 누락
단순 Style을 정의한 후 관련된 ViewGroup/View에 적용 시에는 문제가 되지 않습니다. 다만, Theme를 이용해서 전체 View에 일관된 Style 적용 시에는 Style의 부모 선언을 누락할 경우 문제가 됩니다.
다음 예제는 EditText에 적용할 MyEditTextStyle Style에서 Widget.AppCompat.EditText를 parent로 선언하는 것을 누락했을 경우입니다.
<!-- res/themes.xml -->
<style name="BaseTheme.Styled">
    <item name="android:editTextColor">@color/selector_default_edittext</item>
    <item name="android:editTextBackground">@drawable/bg_edit_text_view</item>
    <item name="android:editTextStyle">@style/MyEditTextStyle</item>
</style>

<!-- res/styles.xml -->
<style name="MyEditTextStyle"> // ◀ parent="Widget.AppCompat.EditText" 정의 누락
    <item name="android:hint">Please Input...</item>
    <item name="android:textSize">20sp</item>
</style>
문제의 Style 적용 결과
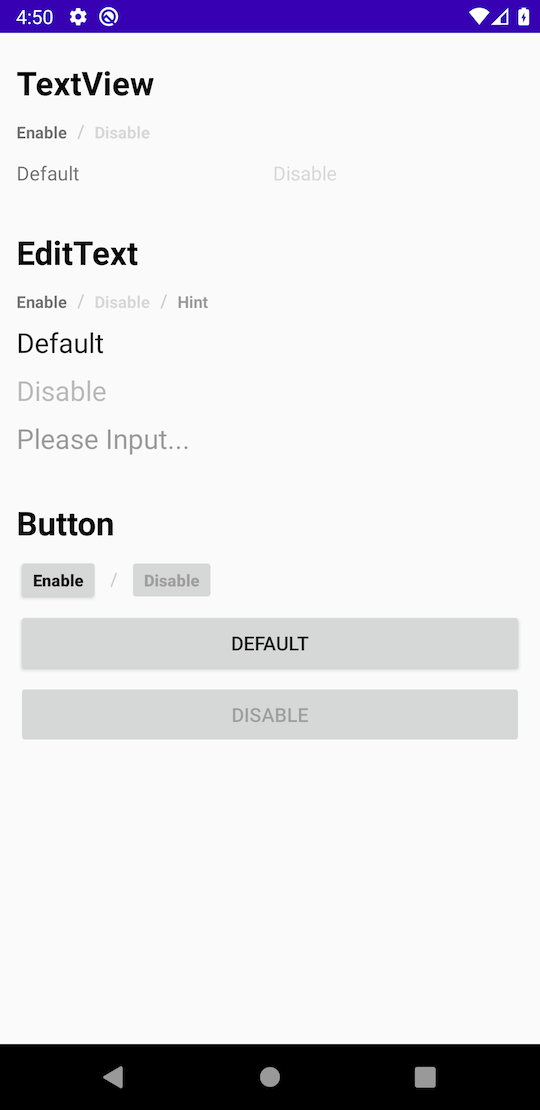
문제의 MyEditTextStyle 을 적용했을 때 hint, textSzie는 적용된 것을 확인할 수 있습니다. Style 처리가 되지 않은 것은 editTextColor, editTextBackground 속성입니다.
| EditText Style 정상 적용 | EditText 부모 Style 적용 누락 |
|---|---|
 |
 |
Style 적용이 안되는 원인
“Widget.AppCompat.EditText” 정의 누락이 왜 editTextColor, editTextBackground 속성에 영향을 주는지를 확인해보겠습니다. EditText의 기본 스타일은 아래와 같이 정의되어 있습니다.
<style name="Widget.EditText">
    <item name="focusable">true</item>
    <item name="focusableInTouchMode">true</item>
    <item name="clickable">true</item>
    <item name="background">?attr/editTextBackground</item>  // ◀ editTextBackground 값 탐색
    <item name="textAppearance">?attr/textAppearanceMediumInverse</item>
    <item name="textColor">?attr/editTextColor</item> // ◀ editTextColor 값 탐색
    <item name="gravity">center_vertical</item>
    <item name="breakStrategy">simple</item>
    <item name="hyphenationFrequency">@dimen/config_preferredHyphenationFrequency</item>
    <item name="defaultFocusHighlightEnabled">false</item>
</style>
여러 가지 속성 중 editTextBackground, textAppearanceMediumInverse, editTextColor 속성은 Theme에서 값을 가져오도록 정의되어 있습니다.
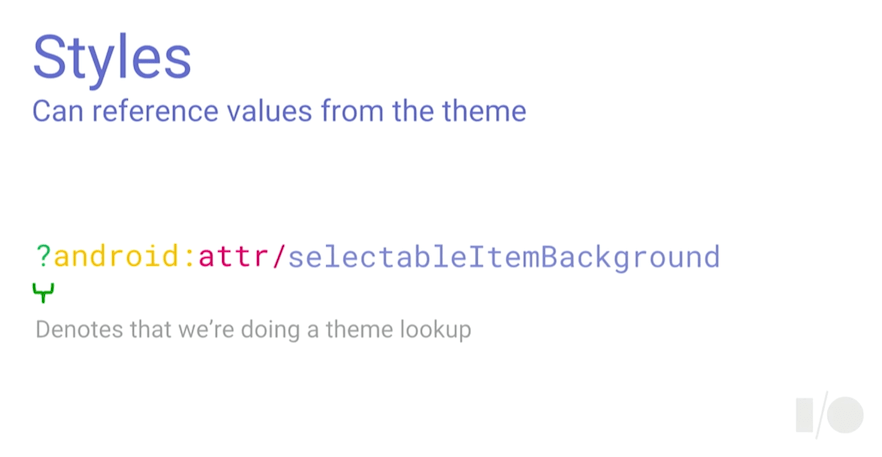
출처 : Android themes & styles demystified - Google I/O 2016 (https://www.youtube.com/watch?v=TIHXGwRTMWI)
실제로 Parent가 누락된 Style은 속성을 스타일화시킨 정보의 집합에 불과합니다. 그래서, EditText에 hint, textSize에 적용되었습니다. 실제로 MyEditTextStyle는 editTextColor와 editTextBackground를 참조하고 있지 않기때문에 EditText에 적용되지않습니다.
<!-- 올바른 수정 -->
<style name="MyEditTextStyle" parent="Widget.AppCompat.EditText">
    <item name="android:hint">Please Input...</item>
    <item name="android:textSize">20sp</item>
</style>
2. editTextStyle의 이상 동작
Theme에서 android:editTextStyle 속성을 재정의할 수 있습니다. 그러나, 이 속성을 사용하셔도 EidtText의 Style은 변경되지 않습니다. Google 검색을 통해서는 AppCompat 버전에 따라서 일부 버전에서 동작한 것으로 보이지만, 현재 최신 버전에서는 Style이 적용되지 않습니다.
그러므로, android namespace가 제거된 editTextStyle을 사용해야 합니다.
<style name="BaseTheme.Styled">
    <!-- Not Working -->
    <item name="android:editTextStyle">@style/MyEditTextStyle</item>
    <!-- Support 4.4.2+ -->
    <item name="editTextStyle">@style/MyEditTextStyle</item>
</style>
Theme&Style에 도움이 되는 자료들
Reference
- Android Developers > Docs > Guides - Styles and Themes : https://developer.android.com/guide/topics/ui/look-and-feel/themes
안드로이드 개발시 스타일 처리에 도움이 되는 글
- Android Styling: Themes vs Styles : https://medium.com/androiddevelopers/android-styling-themes-vs-styles-ebe05f917578
- Android Styling: Common Theme Attributes : https://medium.com/androiddevelopers/android-styling-common-theme-attributes-8f7c50c9eaba
- Android Styling: Prefer Theme Attributes : https://medium.com/androiddevelopers/android-styling-prefer-theme-attributes-412caa748774
- Android Styling: Themes Overlay : https://medium.com/androiddevelopers/android-styling-themes-overlay-1ffd57745207
Style 관련 영상
- Android themes & styles demystified - Google I/O 2016 : https://www.youtube.com/watch?v=TIHXGwRTMWI
- Best Practices for Themes and Styles (Android Dev Summit ‘18) : https://www.youtube.com/watch?v=sNSlDfaNq-0
- Developing Themes with Style (Android Dev Summit ‘19) : https://www.youtube.com/watch?v=Owkf8DhAOSo
샘플 소스
- Pluu/ResourceStackSample : https://github.com/Pluu/ResourceStackSample
Subscribe
Subscribe to this blog via RSS.
Categories
Recent Posts
- Posted on 11 Oct 2025
- Posted on 27 Aug 2025
-
[발표자료] Google I/O Extended Incheon 2025 ~ What's new in Android development tools
Posted on 16 Aug 2025 - Posted on 03 Jun 2025