[번역] DroidKaigi 2018 ~ Support Library의 Downloadable Font와 EmojiCompat을 대응하는 앱을 만들자
본 포스팅은 DroidKaigi 2018 ~ Support LibraryのDownloadable FontsやEmojiCompatに対応したアプリを作ろう 을 기본으로 번역하여 작성했습니다
제 일본어 실력으로 인하여 오역이나 오타가 발생할 수 있습니다.
1p, Support Library의 Downloadable Font와 EmojiCompat을 대응하는 앱을 만들자
DroidKaigi 2018
takahirom
2p, 자기 소개
- takahirom(@new_runnable)
- 본명은 毛受 崇洋 (めんじゅたかひろ)
- Android를 좋아함
-
AbemaTV Android 앱을 만들고 있습니다.
- DroidKaigi 2018 공식 앱의 리더를 맡고 있습니다. 350 개 이상의 Pull Request 감사합니다. 🙇🏻♂️ 설치하지 않으셨다면 설치해주세요
3p, 목차
- Downloadable Font
- Downloadable Font 소개
- Font Resource 소개
- Downloadable Font를 사용해보자
- Downloadable Font 구조
- 어떻게 Downloadable Font를 사용할까?
- EmojiCompat
- EmojiCompat 소개
- EmojiCompat 구조
- 어떻게 EmojiCompat를 사용할까?
- 테스트방법
- 정리
4p, Downloadable Font
5p ~ 9p, Downloadable Font 란
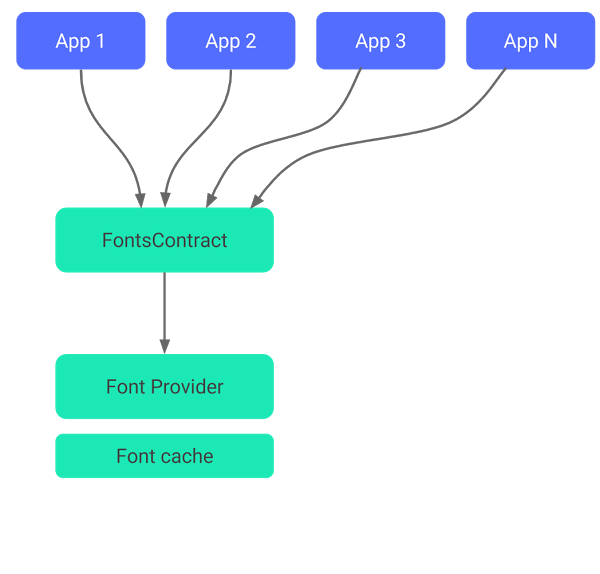
- Font를 얻어내는 구조
- Google I/O 2017에서 What’s New In Android에서 발표
- Android 8.0 (API Level 26)과 Support Library 26에서 사용 가능
- Android 4.0 (API Level 14) 이상에서 동작
10p ~ 15p, Downloadable Font 란
- 프로그램 혹은 리소스로부터 얻는다

- Google Play Services에 Font Provider가 있어, 거기에서부터 얻는다
- 앱에 폰트를 넣지 않는다
- 앱이 폰트를 직접 다운로드하지 않는다
- Google Play Services가 폰트를 캐시해서 준 다
https://developer.android.com/guide/topics/ui/look-and-feel/downloadable-fonts 로부터
16p ~ 19p, Downloadable Font 장점
- 커스텀 폰트를 적용할 수 있다
- 머티리얼 디자인 대응
- 단말 고유의 폰트를 사용하지 않아도 된다
- APK 사이즈를 줄일 수 있다
- 그보다 앱의 인스톨 성공률을 늘릴 수 있다!
- Font를 다른 앱과 공유할 수 있다
- 통신량 감소
- 메모리 사용량 감소
- 저장공간 감소
20p
Downloadable Font 구조가 포함된 Font Resource에 대해서
21p ~ 24p, Font Resource
res/font/hogehoge.ttf → R.font.hogehoge
<TextView android:fontFamily="@font/hogehoge"
Bundled Font와 Downloadable Font 2종류가 있다
25p, Font Resource ~ Bundle Font / Font File
- Font File을 그대로 넣는다 (.otf, .ttf, .ttc)
26p, Font Resource ~ Bundle Font / font-family(.xml)
<?xml version="1.0" encoding="utf-8"?>
<font-family xmlns:app="../apk/res-auto">
    <font
        app:font="@font/orbitron_regular"
        app:fontStyle="normal"
        />
    <font
        app:font="@font/orbitron_bold"
        app:fontStyle="normal"
        app:fontWeight="700"
        />
</font-family>

<TextView
    android:fontFamily="@font/orbitron"
    android:textStyle="bold"
textStyle로 부터 사용할 Font를 변경한다
27p
Downloadable Font를 적용하는 방법을 보겠습니다
28p ~ 31p, Downloadable Font 어떻게 적용할까?
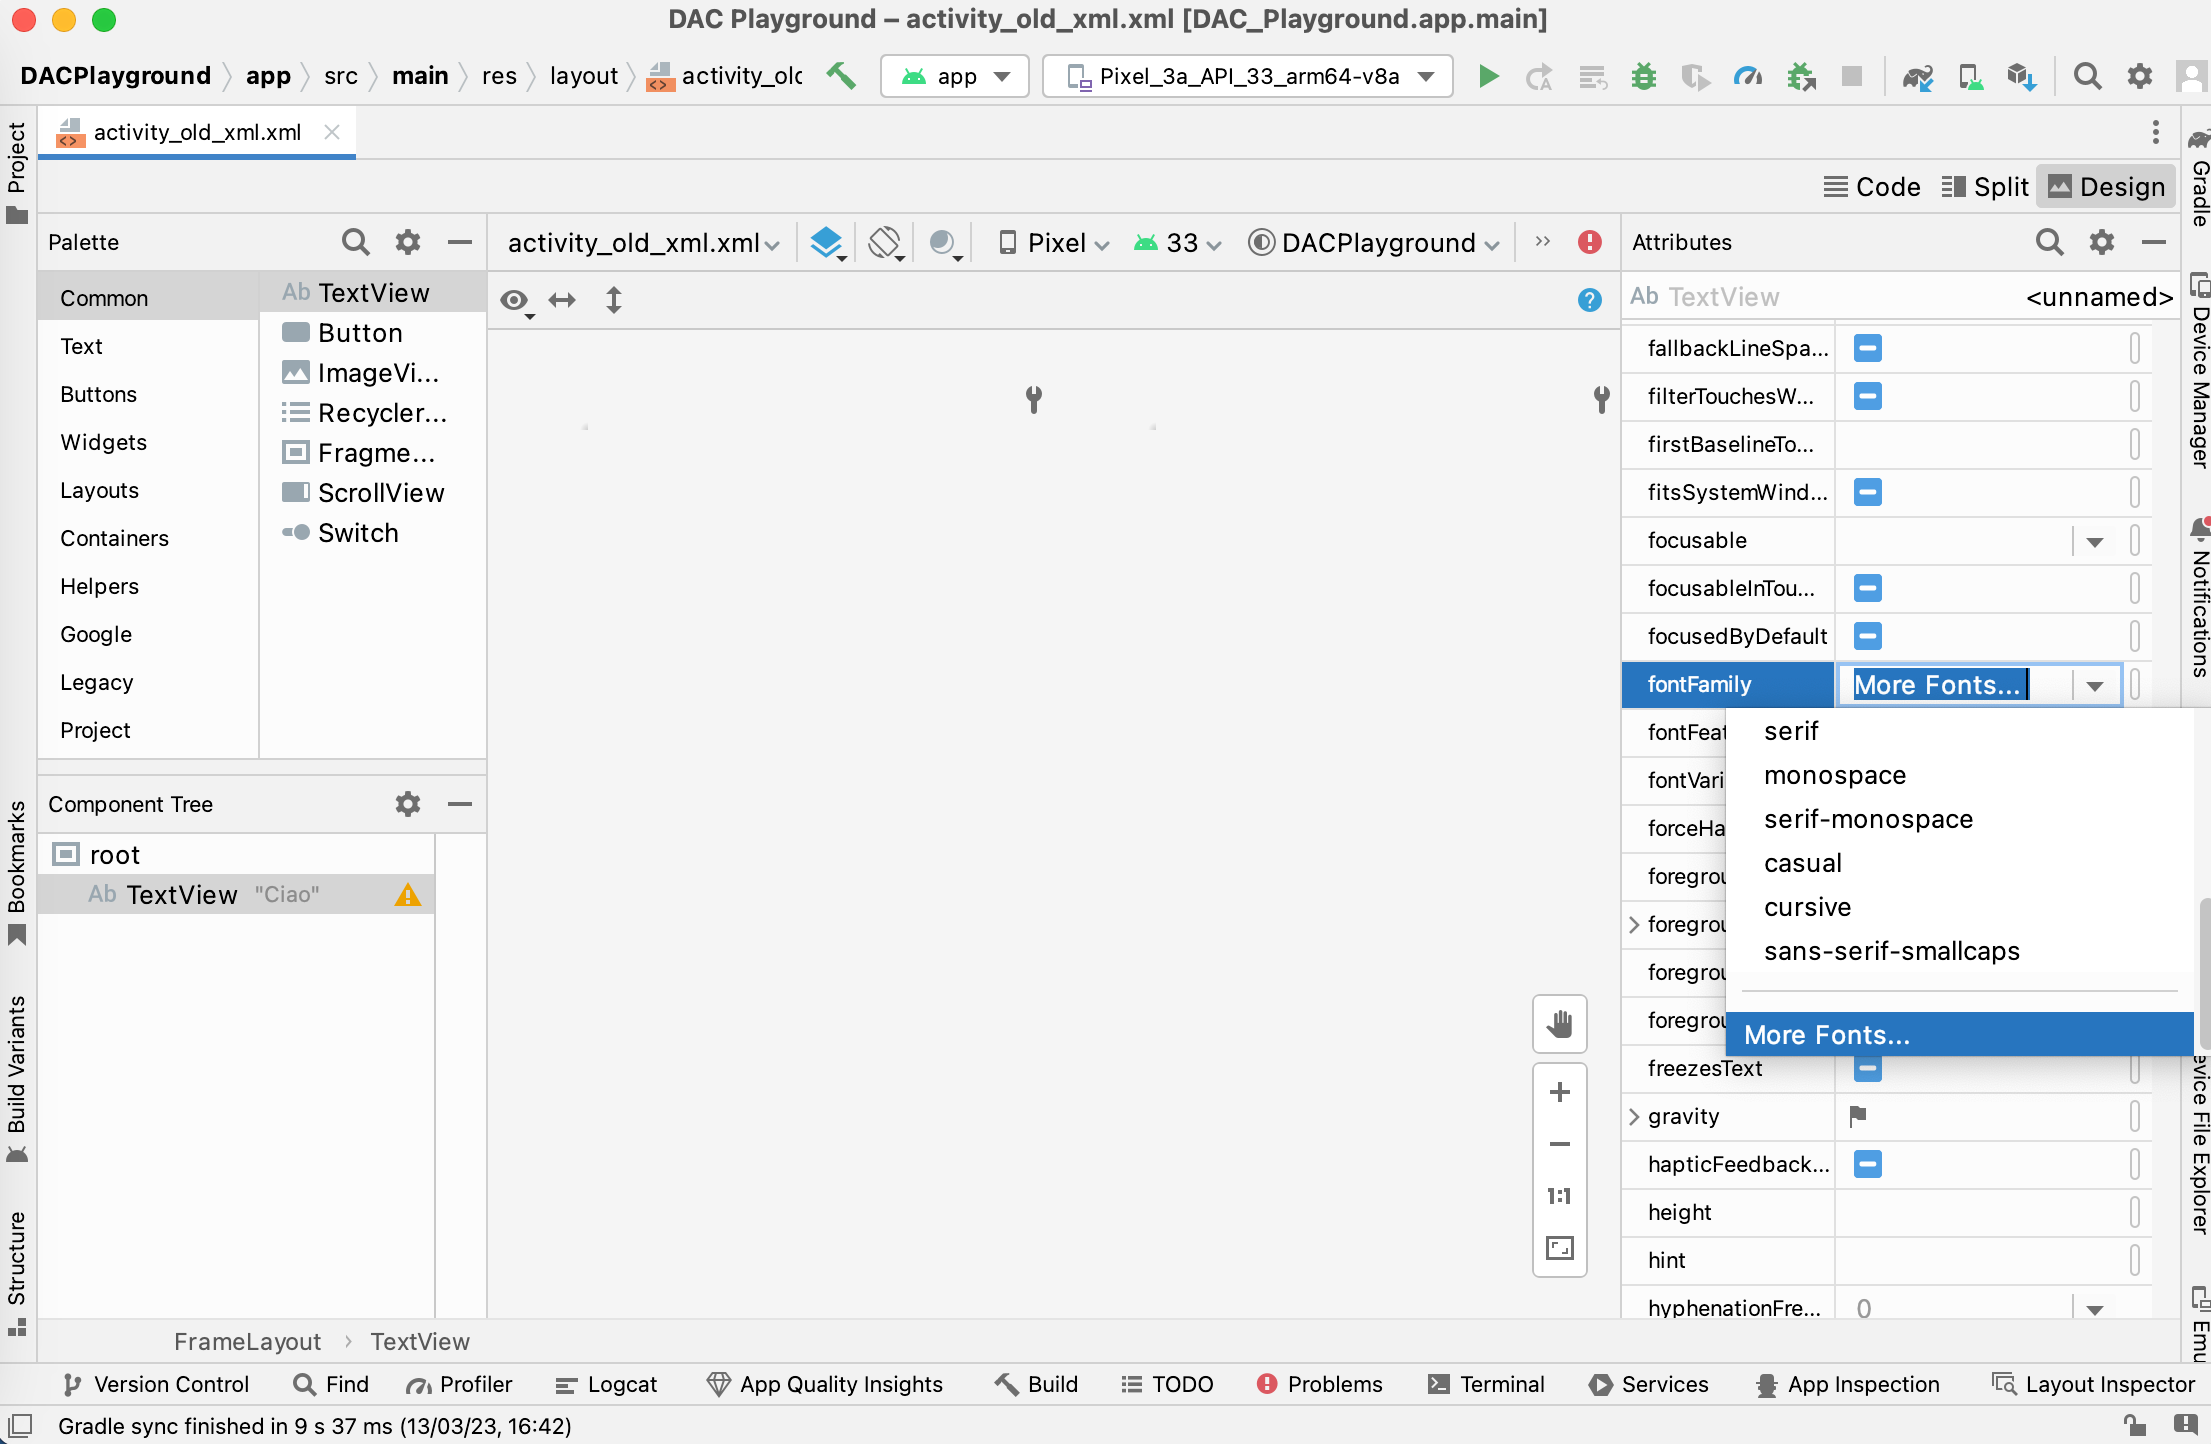
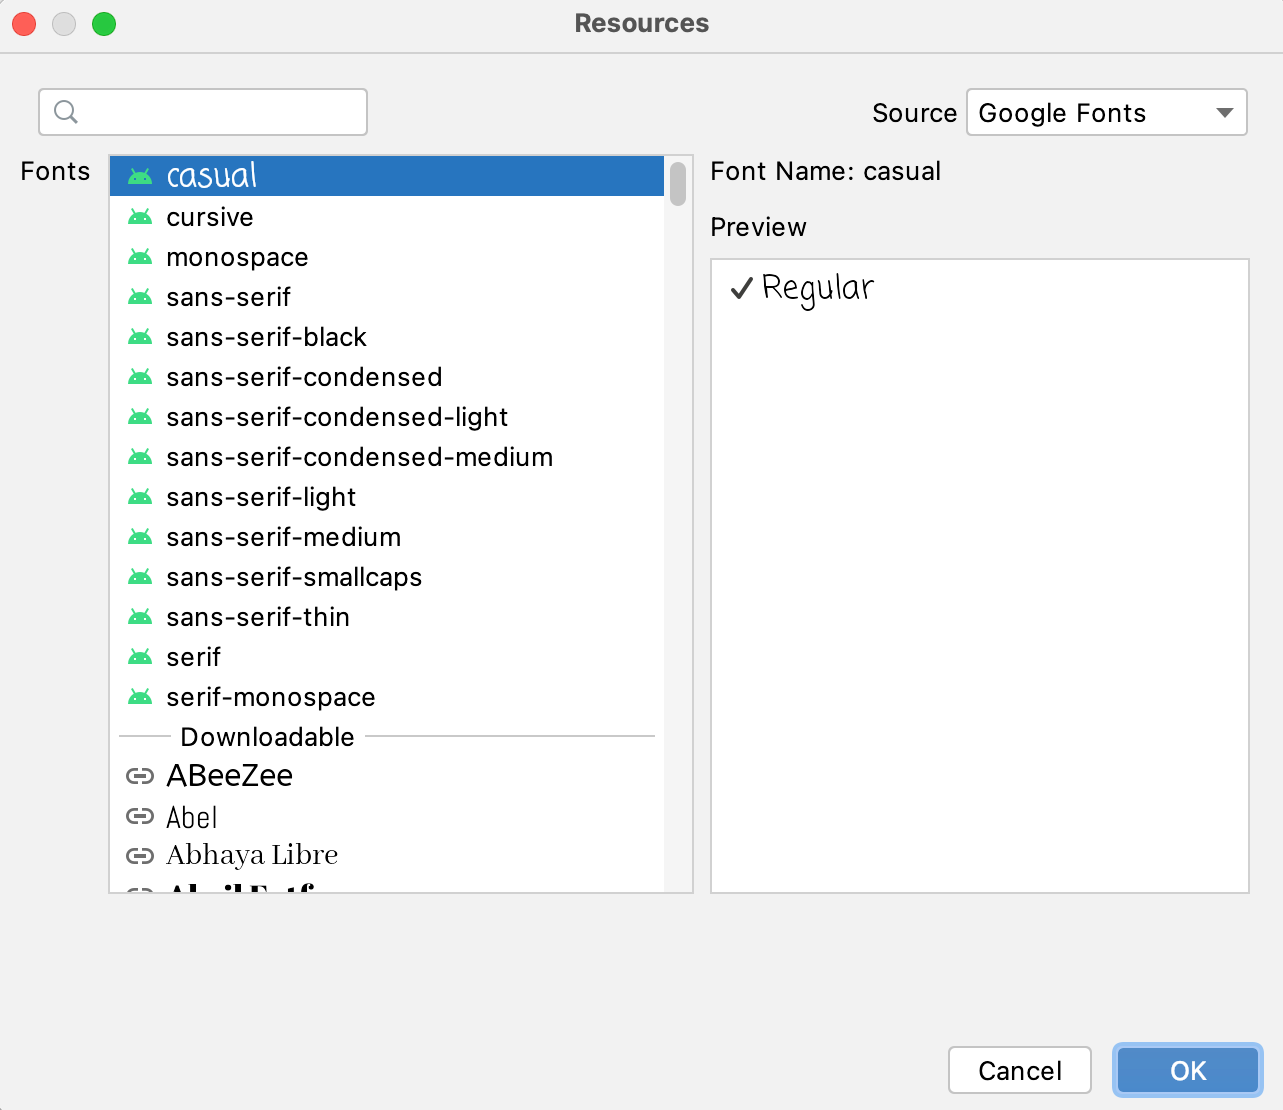
Android Studio 의 레이아웃 내에서 fontFamily를 선택하고 More Fonts…를 선택

- 폰트를 선택한다
- Create downloadable font를 선택한다
- OK를 누른다

이미지는 발표 이미지와 다른, Android Developer 공식 사이트의 이미지가 사용되었습니다.
32p, 어떻게 적용할까? (2/2)
완성
33p, 이 변경으로 앱이 어떻게 되는가?
- modified: res/layout/activity_main.xml
- modified: AndroidManifest.xml
- new file: res/font/days_one.xml
- new file: res/values/font_certs.xml
- new file: res/values/preloaded_fonts.xml
34p, 변경점
https://speakerdeck.com/takahirom/support-libraryfalsedownloadable-fontsyaemojicompatnidui-ying-sitaapuriwozuo-rou?slide=34
35p ~ 40p, activity_main.xml / days_one.xml
layout/activity_main.xml
<TextView
    android:layout_width="wrap_content"
    android:layout_height="wrap_content"
    android:fontFamily="@font/days_one"
    android:text="Hello World!"
/>
TextView에서 Font Resource를 지정
font/days_one.xml
<?xml version="1.0" encoding="utf-8"?>
<font-family
    xmlns:app="http://schemas.android.com/apk/res-auto"
    android:fontProviderAuthority="com.google.android.gms.fonts"
    android:fontProviderPackage="com.google.android.gms"
    android:fontProviderQuery="Days One"
    android:fontProviderCerts="@array/com_goolge_android_gms_fonts_certs">
</font-family>
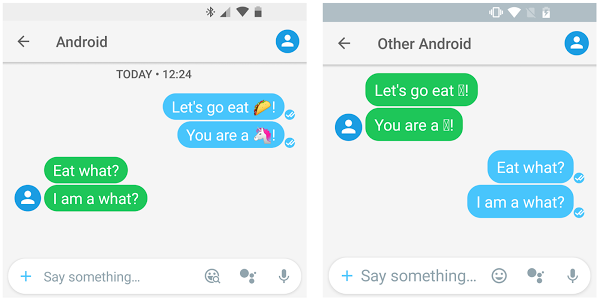
아래를 지정한다
- 폰트명
Google Play Services
- 패키지명
- authority
- 서명이 적혀있는 리소스
preloaded_fonts.xml
<?xml version="1.0" encoding="utf-8"?>
<resources>
    <array name="preloaded_fonts" translatable="false">
        <item>@font/days_one</item>
    </array>
</resources>
preloaded_fonts에는 Font Resource가 지정되어 이 Font가 preload 된다
values/font_certs.xml
<resources>
    <array name="com_goolge_android_gms_fonts_certs">
       <item>@array/com_goolge_android_gms_fonts_certs_dev</item>
       <item>@array/com_goolge_android_gms_fonts_certs_prod</item>
    </array>
    <string-array name="com_goolge_android_gms_fonts_certs_dev">
       <item>
          MIIEqDCCA5C...
       </item>
    </string-array>
    <string-array name="com_goolge_android_gms_fonts_certs_prod">
       <item>
          MIIEQzCCAyug...
       </item>
    </string-array>
</resources>
서명 파일로는 길다. 문자열이 포함되어 있다 (자세한 내용은 나중에 설명)
app/src/main/AndroidManifest.xml
<application
    android:allowBackup="true"
    android:icon="@minmap/ic_launcher"
    android:label="@string/app_name"
    android:roundIcon="@minmap/ic_launcher_round"
    android:supportsRtl="true"
    android:theme="@style/AppTheme"
    >
    <meta-data
        android:name="preloaded_fonts"
        android:resource="@array/preloaded_fonts"
        />
manifest 파일에 preloaded_fonts 가 추가되어 있다
41p ~ 47p, Downloadable Font 구조
Support Library와 Platform 구현이 있어 기본적으로 같다
- (AppCompat)TextView로부터 얻어내기 어렵다
- 취득처 앱의 서명 체크
- ContentResolver를 통해 Google Play Services로부터 Font를 얻는다
※ Support Library 27.0.2를 기준으로 이야기합니다
48p, AppCompatTextView로부터 얻어내기 어렵다
// AppCompatViewInflater.java
switch (name) {
    case "TextView":
        view = new AppCompatTextView(context, attrs);
        break;
    case "ImageView":
        view = new AppCompatImageView(context, attrs);
        break;
}
레이아웃의 “TextView” 대신에 AppCompatTextView 가 만들어진다
49p, AppCompatTextView로부터 얻어내기 어렵다
AppCompatTextView 생성자
→ AppCompatTextHelper#loadFromAttributes()
→ TintTypedArray#getFont()
여기에서
ResourceCompat#getFont()를 사용해 Font를 얻는다
50p ~ 53p, AppCompatTextHelper
ResourcesCompat.FontCallback replyCallback =
    new ResourcesCompat.FontCallback replyCallback() {
    @Override
    public void onFontRetrieved(@NonNull Typeface typeface) {
        onAsyncTypefaceReceived(textViewWeak, typeface);
    }
    @Override
    public void onFontRetrievalFailed(int reason) {
        // Do nothing.
    }
};

try {
    // Note the callback will be triggered on the UI thread.
    mFontTypeface = a.getFont(fontFamilyId, mStyle, replyCallback);
    mAsyncFontPending = mFontTypeface == null;
} catch (UnsupportedOperationException | Resource.NotFoundException e) {
    // Expected if it is not a font resource.
}

private void onAsyncTypefaceReceived(WeakReference<TextView> textViewWeak, Typeface typeface) {
    if (mAsyncFontPending) {
        mFontTypeface = typeface;
        final TextView textView = textViewWeak.get();
        if (textView != null) {
            textView.setTypeface(typeface, mStyle);
        }
    }
}
비동기로 처리해서 얻었다면 textView#setTypeface() 로 설정한다
54p, Downloadable Font 구조
Support Library와 Platform 구현이 있어 기본적으로 같다
- (AppCompat)TextView로부터 얻어내기 어렵다
취득처 앱의 서명 체크- ContentResolver를 통해 Google Play Services로부터 Font를 얻는다
※ Support Library 27.0.2를 기준으로 이야기합니다
55p, PackageManager를 사용해 패키지의 서명 체크
- 제대로 폰트를 얻으려는 곳이 Google Play Services 인지 체크한다
- Google Play Services와 패키지명이 동일한지, 다른 가짜 앱에서 잘못된 폰트를 얻지 않도록 하기 위한 구조
56p, PackageManager를 사용해 패키지의 서명 체크
FontsContractCompat
List<byte[]> signatures;
PackageInfo packageInfo = packageManager.getPackageInfo(info.packageName, PackageManager.GET_SIGNATURES); // info.packageName => "com.google.android.gms" = Google Play Services

// PackageManager로부터 Google Play Services 앱의 Signature를 얻어 바이트 배열로 변환한다
signatures = convertToByteArrayList(packageInfo.signatures);

List<List<byte[]>> requestCertificatesList = getCertificates(request, resources);
for (int i = 0; i < requestCertificatesList.size(); ++i) {
    List<byte[]> requestSignatures = new ArrayList<>(requestCertificatesList.get(i));
    Collections.sort(requestSignatures, sByteArrayComparator);
    // 바이트 배열을 비교해서 동일하면 정보를 반환한다
    if (equalsByteArrayList(signatures, requestSignatures)) {
        return info;
    }
}
return null;
58p, Downloadable Font 구조
Support Library와 Platform 구현이 있어 기본적으로 같다
- (AppCompat)TextView로부터 얻어내기 어렵다
- 취득처 앱의 서명 체크
ContentResolver를 통해 Google Play Services로부터 Font를 얻는다
※ Support Library 27.0.2를 기준으로 이야기합니다
59p ~ 60p, 폰트 취득은 ContentResolver를 통해 Google Play Services로부터 취득
폰트 취득은 3중으로 Wrapping 되어 구현되어 있다
ContentResolver 처리 - FontsContractCompat - ResourceCompat
61p, 폰트 취득은 ContentResolver를 통해 Google Play Services로부터 취득
ContentResolver와 ContentProvider는 Android에 오래전부터 있었다
애플리케이션간의 데이터를 주고받는 구조
62p ~ 63p, 구조 해설 : 폰트 취득은 ContentResolver를 통해 Google Play Services로부터 취득
실제로 ContentResolver를 통해 Goolge Play Service로부터 얻을 수 있습니다
val fileBaseUri = Uri.Builder().scheme(ContentResolver.SCHEME_CONTENT)
	.authority("com.google.android.gms.fonts")
	.build()

var cursor = contentResolver.query(
    uri,
    arrayOf(	// ContentResolver를 사용해 얻는다
        FontsContractCompat.Columns._ID,
        FontsContractCompat.Columns.FILE_ID,
        FontsContractCompat.Columns.TTC_INDEX,
    	""
    ),
    "query = ?",
    arrayOf("Days One"),   // 폰트 이름
    null
)
64p, 폰트 취득은 ContentResolver를 통해 Google Play Services로부터 취득
폰트 취득은 3중으로 Wrapping 되어 구현되어 있다
ContentResolver 처리 - FontsContractCompat - ResourceCompat
65p ~ 67p, 구조 해설 : FontsContractCompat
조금 전의 ContentResolver 방법에는 서명 체크가 포함되어 있지 않고, 안전하지 않습니다.
FontsContract를 사용하면 패키지 체크도 해주므로 안전하게 가져올 수 있습니다
val request = FontRequest(
    "com.google.android.gms.fonts",
    "com.google.android.gms",
    "Days One",
    R.array.com_google_android_gms_fonts_certs_prod
)
// FontRequest를 작성
// ContentResolver에 필요한 Authority 이름, 폰트명, 서명이 들어있는 리소스를 지정한다
FontsContractCompat.requestFont(
    this,
    request,
    object : FontsContractCompat.FontRequestCallback() {
        override fun onTypefaceRetrieved(typeface: Typeface?) {
            // Callback을 통해 TextView의 typeface에 설정한다
            textView.typeface = typeface
        }

        override fun onTypefaceRequestFailed(reason: Int) {
            super.onTypefaceRequestFailed(reason)
        }
    }, Handler()
)
68p, 폰트 취득은 ContentResolver를 통해 Google Play Services로부터 취득
폰트 취득은 3중으로 Wrapping 되어 구현되어 있다
ContentResolver 처리 - FontsContractCompat - ResourceCompat
69p, ResourceCompat을 사용해 Font Resource를 얻는다
FontsContractCompat은 ContentProvider보다 간단하지만, Google Play Services의 패키지명 지정 등으로 어렵습니다.
조금 전 설명한 Font Resource를 사용해봅시다.
Font Resource로 조금 전 작성한 패키지명 등이 적혀있습니다.
<?xml version="1.0" encoding="utf-8"?>
<font-family xmlns:app="http://schemas.android.com/apk/res-auto"
    app:fontProviderAuthority="com.google.android.gms.fonts"
    app:fontProviderPackage="com.google.android.gms"
    app:fontProviderQuery="Days One"
    app:fontProviderCerts="@array/com_google_android_gms_fonts_certs">
</font-family>
70p ~ 71p, ResourcesCompat
ResourcesCompat을 사용해 폰트에 접근
상당히 깔끔해졌습니다.
fontText.typeface = ResourcesCompat.getFont(this, R.font.orbitron)
[X] MainThread를 Block해서 얻으므로 주의할 필요가 있다
72p, ResourcesCompat
비동기로 사용도 가능합니다. (Support Lib 27.0.0부터 추가된 메소드)
ResourcesCompat.getFont(
    this,
    R.font.orbitron,
    object : ResourcesCompat.FontCallback() {
        override fun onFontRetrieved(typeface: Typeface) {
            fontText.typeface = typeface
        }
        override fun onFontRetrievalFailed(reason: Int) {
        }
    },
    Handler())
73p
어떻게 Downloadable Font를 사용할 것 인가?
74p
아직 Downloadable Font에 일본어는 없습니다 😇
75p ~ 77p, Downloadable Font에 일본어가 없는 것
Get Started with the Google Fonts for Android라는 페이지에 아래와 같이 있습니다
Which fonts can I use?
The entire Google Fonts Open Source collection! Visit https://fonts.google.com to browse.
fonts.google.com에 있는 폰트를 사용할 수 있다!
78p ~ 80p, Downloadable Font에 일본어가 없는 것
fonts.google.com 내에는 일본어 font는 아직 없다
fonts.google.com 에는 Early Access라는 항목이 있고, 그 페이지에는 일본어 폰트가 있습니다.
그러므로, 그 Early Access가 끝나면 가능성이 있어보입니다 😭
81p, Downloadable Font에 일본어가 없는 것
googlesamples/android-DownloadableFonts 의 issue에 작은 저항 (무의미)을 했으니, ❤ 눌러주세요.
82p, Downloadable Font는 안되지만 Bundled Font는 가능하다
Downloadable Font는 아니지만 단순히 Bundled Font로 Font Resource를 이용해 사용할 수 있습니다.
그 때의 기술을 소개합니다.
83p, Font Resource 이상적인 도입
머티리얼 디자인이라면 일본어는 고밀도(Dense Script)이며 Noto 폰트를 기준으로 작성됩니다.
일본어 머티리얼 디자인의 타이포그래피 인용
타이포그래피
Ice Cream Sandwich 출시 이후, Android 표준 폰트가 된 것이 Roboto입니다. 한편, Roboto에 대응하지 않는 언어용 Android 표준 폰트로 Froyo부터 도입된 것이 Noto입니다. Noto는 ChromeOS에서 모든 언어에에 대응하는 표준 폰트로도 사용되고 있습니다.
고밀도 : 커다란 글리프(Glyph)에 대응하도록 행간에 여유를 가질 필요가 있는 언어의 문자. 중국어, 일본어, 한국어가 해당합니다. Noto에는 해당 언어에 대해 7종류의 Weidth가 있습니다.
84p ~ 86p, Font Resource 이상적인 도입
머티리얼 디자인의 Dense script 항목 인용

각각 크기와 폰트가 설정되어 있다
87p, Font Resource 이상적인 도입
각각의 TextAppearance 가 준비되어 있어 fontFamily와 크기를 지정
여기에서 font/notosans_medium.otf 등 FontFamily 앱에 넣는다
DroidKaigi 2018 인용
<style name="TextAppearance.App.Title" parent="TextAppearance.AppCompat.Title">
    <item name="android:textSize">21sp</item>
    <item name="android:fontFamily">@font/notosans_medium</item>
</style>

<style name="TextAppearance.App.Subhead" parent="TextAppearance.AppCompat.Subhead">
    <item name="android:textSize">17sp</item>
    <item name="android:fontFamily">@font/notosans_regular</item>
</style>
88p ~ 90p, Font Resource 이상적인 도입
TextView에 지정한다
<TextView
    android:id="@+id/speaker_name"
    android:textAppearance="@style/TextAppearance.App.Body1"
    android:layout_width="wrap_content"
    android:layout_height="wrap_content"
잘 움직인다 🙆♀️
X Toolbar의 Title 등 기본 폰트도 app:textAppearance 등으로 설정해야 한다
91p, 기본 폰트 설정
테마쪽에서 어떻게 안될까?
<style name="AppTheme" parent="Theme.AppCompat.Light">
    <item name="android:textAppearance">@style/TextAppearance.hogehoge</item>
    <item name="android:textAppearanceSmall">@style/TextAppearance..</item>
    <item name="android:textAppearanceButton">@style/TextAppearance</item>
    <item name="android:textAppearanceMediumInverse">@style/TextAppearance</item>
X 가능하지만 많이 있다. 힘듬
92p, 기본 폰트 설정
christens/Calligraphy를 사용
Calligraphy란 Android Standard 라이브러리로 기본 폰트를 설정 가능
@Override
public void onCreate() {
    super.onCreate();
    CalligraphyConfig.initDefault(
        new CalligraphyConfig.Builder()
        	.setDefaultFontPath("fonts/Roboto-RobotoRegular.ttf")
    		.setFontAttrId(R.attr.fontPath)
    		.build()
    );
X 하지만 Calligraphy는 오래전부터 있던 라이브러리로 새로운 Font Resource는 지정할 수 없고, 호환성도 없다
93p ~ 95p, 기본 폰트 설정
- 또한 “Calligraphy is dead”라고 제작자가 이야기했으므로 앞으로는 사용하지 않는 편이 좋다
- 그리고 migration guide는 찾을 수 없었다. 😇
https://twitter.com/chrisjenx/status/865273111129726977
96p ~ 97p, 이 세션의 내용
▪️️내용
어떤 구조로 움직이는가.
Downloadable Fonts의 일본어 폰트 대응 상황에 대해.
실제로 Calligraphy를 Downloadable Fonts등의 Font Resources로 교체하는 방법. 😇
EmojiCompat의 API level 19에 어떻게 대응하는가.
어떻게 테스트하는가.
등 실천적인 부분을 소개합니다.
98p
라이브러리를 만들었습니다
99p ~ 103p, Font Resource로 기본 폰트를 지정하는 라이브러리 만들었습니다
Calligraphy를 구조를 이용한 라이브러리를 만들었습니다
Calligraphy와 같은 스펙으로 설정하는 것으로
CalligraphyConfig.initDefault(new CalligraphyConfig.Builder()
	.setDefaultFontPath(R.font.roboto_reqular)
	.build());
@Override
protected void attachBaseContext(Context newBase) {
    super.attachBaseContext(CalligraphyContextWrapper.wrap(newBase));
}
104p ~ 107p, Font Resource로 기본 폰트를 지정하는 라이브러리 만들었습니다
DroidKaigi 앱에서 제대로 움직이고 있습니다
https://github.com/DroidKaigi/conference-app-2018/pull/39
여기에 있는 사람이 Start 해서 유명한 라이브러리가 된다면 안심해서 사용할 수 있을 터이다. 🙇🏻♂️
takahirom/DownloadableCalligraphy
https://github.com/takahirom/DownloadableCalligraphy
108p
여기까지가 50~60%
14:15라면 페이스대로
109p
EmojiCompat
110p ~ 112p, EmojiCompat 소개

tohu ☐ 를 막을 수 있다
https://developer.android.com/guide/topics/ui/look-and-feel/emoji-compat 인용
113p, EmojiCompat 소개
- 최신 이모티콘을 Android OS 업데이트 없이 사용할 수 있다
- 이틀 전 (2018/02/07) Unicode Emoji 11.0가 출시되어 157개의 새로운 이모티콘이 추가되었습니다.
- 당분간 불가피합니다.
http://blog.unicode.org/2018/02/unicode-emoji-110-characters-now-final.html?m=1
114p, EmojiCompat 소개
- API Level 19
- DownloadableFont 버전과 Bundle 버전이 있다
- Bundle 버전은 이모티콘이 라이브러리 내에 포함되어 있어 6.5MB 이므로 특수한 사정이 아닌 경우, 기본적으로는 Downloadable Font 버전이 좋다고 생각한다
115p ~ 117p, EmojiCompat 기본적인 사용 방법
Application#onCreate
val fontRequest = FontRequest(
	"com.google.android.gms.fonts",
	"com.google.android.gms",
	"Noto Color EmojiCompat",
	R.array.com_google_android_gms_fonts_certs)
val config = FontRequestEmojiCompatConfig(context, fontRequest)

EmojiCompat.init(config)
조금전의 Font Request를 사용해 EmojiCompat.init() 으로 초기화
implementation "com.android.support:support-emoji:27.0.2"
118p, EmojiCompat 기본적인 사용 방법
나머지는 기본적으로 아래와 같이 이모티콘이 사용되는 곳에 각각 View를 사용
<android.support.text.emoji.widget.EmojiAppCompatTextView
	android:id="@+id/text"
	android:layout_width="wrap_content"
	android:layout_height="wrap_content"
	/>
<android.support.text.emoji.widget.EmojiAppCompatEditText
	android:id="@+id/edit"
	android:layout_width="wrap_content"
	android:layout_height="wrap_content"
	/>
...
implementation "com.android.support:support-emoji-appcompat:27.0.2"
119p, EmojiCompat Module
- 3가지 Module이 존재한다
implementation "com.android.support:support-emoji:27.0.2"
implementation "com.android.support:support-emoji-appcompat:27.0.2"
implementation "com.android.support:support-emoji-bundled:27.0.2"
Download 버전
→ emoji-appcompat
Bundle 버전을 이용하는 경우
→ emoji-bundled
→ emoji-appcompat
120p, EmojiCompat.Config에 따른 설정
.setEmojiSpanIndicatorEnabled(true)
.setEmojiSpanIndicatorColor(Color.GREEN)
EmojiCompat에 따라 교체가 이루어지는 부분을 알 수 있다. (디버그용)
121p, EmojiCompat.Config에 따른 설정
.setReplaceAll(true)
시스템이 표시 불가능한 이모티콘만을 교체하는 것이 아니라 전부를 교체할지 여부
통일감을 가진다면 전부 교체하는 편이 좋다
122p ~ 123p, 구조에 들어가기 전에 이모티콘에 대해서
Java는 통상, 16비트의 char 데이터 타입을 사용
그러나 16비트에 포함되지 못한 이모티콘 등은 32비트, 2개의 char을 사용해 표현된다.
이 방법을 Surrogate Pair라고 한다.
124p, 구조에 들어가기 전에 이모티콘에 대해서
Surrogate Pair는 31비트 값으로 표현한다
그것을 Code Point 라고 한다
👨 = U+1F468 = \ud83d\udc68
↑ Code Point
125p, 구조에 들어가기 전에 이모티콘에 대해서
어느 Code Point가 어떤 이모티콘에 대응하는지 Emoji Charts로 확인할 수 있습니다
http://unicode.org/emoji/charts/full-emoji-list.html
126p ~ 128p, 구조에 들어가기 전에 이모티콘에 대해서
Code Point를 얻거나 문자열로 고칠 수 있습니다.
// String -> code point
val face = "\ud83d\udc68"
// Character.toCodePoint에 char를 2개 넘길 뿐뿐뿐뿐
val codePoint: Int = Character.toCodePoint(face[0], face[1])
println(Integer.toHexString(codePoint))

// code point -> String
// Character.toChars에 Code Point를 넘길 뿐
val charArray: CharArray = Character.toChars(codePoint)
val string = String(charArray)
println(string)
129p, 구조에 들어가기 전에 이모티콘에 대해서
복수 Code Point로부터 만들어진 이모티콘이 존재한다
| U+1F468 | U+1F3FB | U+200D | U+1F4BB |
|---|---|---|---|
| 👨 | 🏻 | ZWJ | 💻 |
ZWJ = 문자를 결합시키는 제어문자
130p, 구조에 들어가기 전에 이모티콘에 대한 튜토리얼
- 이것도 Emoji Charts 페이지에서 확인할 수 있습니다
https://speakerdeck.com/takahirom/support-libraryfalsedownloadable-fontsyaemojicompatnidui-ying-sitaapuriwozuo-rou?slide=130
131p ~ 132p, 구조에 들어가기 전에 이모티콘에 대한
이 Code Point를 Code로 표현하기 위해서는?
| U+1F468 | U+1F3FB | U+200D | U+1F4BB |
|---|---|---|---|
| 👨 | 🏻 | ZWJ | 💻 |
val face = Character.toChars(0x1f468)
val lightSkin = Character.toChars(0x1f3fb)
val zwj = Character.toChars(0x200d)
val computer = Character.toChars(0x1f4bb)
val programmer = face + lightSkin + zwj + computer
programmer.forEach {
    println(Integer.toHexString(it.toInt()))
}
이것을 먼저 char의 array를 얻어
다음 슬라이드에서 “programmer”를 사용
133p ~ 134p, 구조에 들어가기 전에 이모티콘에 대해서
textView.typeface = ResourcesCompat.getFont(this, R.font.noto_color_emoji)
textView.text = String(programmer)
// or
textView.text = "\ud83d\udc68\ud83c\udffb\u200d\ud83d\udcbb"
EmojiCompat이 없어도 이모티콘은 동작하지만
135p, EmojiCompat이 없으면?
- 폰트를 전부 교체하면 이모티콘 이외의 부분에서 Custom Font 대응할 수 없다
- Android 4.4에서는 일반 Noto Color Emoji Font를 읽어 들일 때에 Exception이 일어난다
→ 제대로 교체하면서 다른 폰트가 필요 (이후 EmojiCompat에서 이야기합니다)
136p ~ 137p, EmojiApppCompatTextView는 어떻게 이모티콘을 사용하는가?
TextView#setTransformationMethod를 사용
TextView가 표시할 문자를 변환한다
Password TransformationMethod 의 사례
<TextView
    android:id="@+id/textView"
    android:text="test"
editText.transformationMethod = PasswordTransformationMethod()
138p ~ 139p, EmojiApppCompatTextView는 어떻게 이모티콘을 사용하는가?
TransformationMethod로 ReplacementSpan라는 Class를 확장한 TypefaceEmojiSpan을 사용한다
ReplacementSpan에서는 draw 메소드를 override하면 다른 문자를 그리거나 할 수 있다
public final class TypefaceEmojiSpan extends EmojiSpan {
...
    @Override
    public void draw(@NonNull final Canvas canvas, ..., @NonNull final Paint paint) {
    	getMetadata().draw(canvas, x, y, paint);
    }
...
}
// EmojiMetadata.java
public void draw(@NonNull final Canvas canvas, final float x, ..., @NonNull final Paint paint) {
    final Typeface typeface = mMetadataRepo.getTypeface();
    ...
    paint.setTypeface(typeface);
    ...
    canvas.drawText(..., paint);
}
paint에 setTypeface해서 canvas.drawText() 하는 것 뿐
140p
어떻게 이모티콘만을 TypefaceEmojiSpan으로 교체하는가
141p ~ 145p, 문자열의 어디까지가 이모티콘인가 판정하는 구조
- 그런 Android API는 없어보인다
Font File을 FlatBuffer로 읽어 이모티콘의 트리 구조를 만든다
이모티콘의 트리 구조 (간략화)
class Node {
    val children: Map<Int, Node>
    val data
}
146p ~ 150p, 문자열의 어디까지가 이모티콘인가 판정하는 구조
root
↓ + codepoint = U+1F468
data: F0048
↓ 🏻 ← codepoint = U+1F3FB (node.children.get(0x1F3FB))
data: F0606
↓ ZWJ (문자를 결합시키는 제어문자)
…
151p, 문자열의 어디까지가 이모티콘인가 판정하는 구조
이 data의 Code Point는 EmojiCompat의 Font가 가지고 있는 Private Use Area에 맵핑되어있어 그곳을 참조하고 있다.
- Font File 내의 Mapping
| data: F0048 | <map code="0xf0048" name="u1F468" /> |
| data: F0606 | <map code="0xf0606" name="uF0606" /> |
152p, 이모티콘을 판정하는 구조
이 Tree를 사용해 문자열에서 하나씩 Code Point를 읽어 Tree에 있는 data를 적용해나간다
int currentOffset = start;
int codePoint = Character.codePointAt(charSequence, currentOffset);

while (currentOffset < end && addedCount < maxEmojiCount) {
    final int action = sm.check(codePoint);

    switch (action) {
        case ACTION_ADVANCE_BOTH:
            start += Character.charCount(Character.codePointAt(charSequence, start));
            currentOffset = start;
            if (currentOffset < end) {
                codePoint = Character.codePointAt(charSequence, currentOffset);
            }
...
153p ~ 157p, 어떻게 EmojiCompat을 사용할 것 인가?
- 간단하게 이용할 수 있다
- Downloadable Font 버전을 추천
- 많은 문자가 나오는 앱에서는 표현이 늘어나므로 좋다
- 기본적으로 모든 이모티콘을 교체 가능한 ReplaceAll을 기본적으로 사용하는 편이 좋아 보인다
158p, EmojiCompat은 API Level 19
Emoji Font가 이용할 수 있게 된 것은 API Level 19부터 있으므로,
EmojiCompat의 기능은 API Level 18 미만은 사용할 수 없다
159p, EmojiCompat은 API Level 19
EmojiAppCompatTextView의 코멘트
- When used on devices running API 18 or below, this widget acts as a regular {@link AppCompatTextView}.
- API Level 19 미만에서는 단순히 TextView로서 다루므로 지금처럼 동작한다
- 일반 Product에서는 4.4 미만 유저수는 적어지고 있기 때문에 걱정하지 않아도 좋아보인다.
160p ~ 161p, Downloadable Font의 테스트 방법
- Emulator로 하는 경우는 Play Store 버전을 설치
- 그리고 Google Play services의 버전 업데이트를 할 수 있다
- 그러면 동작한다
162p, 테스트 방법
- 기본적으로 바뀌었는가 아닌가로 확인할 수 있다
- Font 차이는 확인하는 것은 어려우므로 murooka/go-diff-image 등으로 확인하는 것이 좋았다
- 제대로 동작하지 않을 때는 Support Library이므로 평소처럼 Debug로 볼 수 있고 코드도 읽을 수 있다
- Support Library 갱신 이력을 보면 Bug Fixed를 빈번하게 하므로 주시하는 편이 좋다
163p, 정리
- Downloadable Font도 EmojiCompat도 아주 간단하게 사용할 수 있다
- DownloadableCalligraphy를 Start 눌러주세요 ⭐️
- Downloadable Font는 아쉽지만 지금은 일본어에 대응하지 않습니다만, 곧 대응할지도 모릅니다 😭
- EmojiCompat이 API Level 19인 부분은 19 미만의 유저는 적어 사용할 수 없는 것은 아니기 때문에 사용해버려도 좋아 보인다
164p, 참고문헌 / 인용
- Android Developers https://developer.android.com/index.html
- Android Open Source Project https://source.android.com
- Emoji Charts http://unicode.org/emoji/charts/full-emoji-list.html
- Exploring the Android EmojiCompat Library https://medium.com/exploring-android/exploring-the-android-emoji-compatibility-library-1b9f3bb724aa
- Google I/O https://www.youtube.com/watch?v=1N9KveJ-FU8
- potatotips #41에서 Android Font의 신기능에 대해 발표했습니다. https://qiita.com/tsuyosh/items/372b785e395397877d2c)
- Java 에서의 Unicode Surrogate Programming https://www.ibm.com/developerworks/jp/ysl/library/java/j-unicode_surrogate/index.html
- Android가 4.4에서 이모티콘을 제대로 대응 https://mstssk.blogspot.jp/2014/02/emoji.html)
165p, Sample
https://github.com/takahirom/droidkaigi-2018-fonts
Currnte Pages Tags
Subscribe
Subscribe to this blog via RSS.
Categories
Recent Posts
- Posted on 03 Jun 2025
-
[요약] What's new in Android development tools (Google I/O '25)
Posted on 25 May 2025 -
Jetpack Compose: LazyColumn/LazyRow 내부 코드 분석 ~ 3부 LazyLayout
Posted on 20 Apr 2025 - Posted on 28 Mar 2025