CustomView의 레이아웃 1-Depth 줄이기
Android 개발 시 새로운 디바이스와 새로운 OS는 개발자에게 있어서 다양한 시도를 도와주는 부분이기도 합니다. 다양한 자원들의 상한선/하한선 등 사용 가능한 경계선의 범위가 점점 넓어지고 있습니다. 그러기에 Android 앱 개발시에 자원을 남용하기 쉽습니다.
본 글에서는 레이아웃 깊이를 1단계 줄이는 방법 중 하나를 소개합니다.
서론
하나의 화면을 구성하는 방법은 작성자에 따라서 다양한 방법으로 결과를 만듭니다. 그중 레이아웃 작업시에는 XML을 사용해서 구성하는 경우가 대부분입니다.
레이아웃용 XML도 하나의 XML에 작성을 남용하는 경우에 속도가 느려진다는 것을 알고 계시나요? Android Studio에 기본적으로 적용된 Lint는 아래와 같습니다.
- 단일 XML에서 View Element의 갯수가
80개이상인 경우 - 단일 XML에서 레이아웃 깊이가
10-Depth이상인 경우
출처 : https://android.googlesource.com/platform/tools/base/+/master/lint/libs/lint-checks/src/main/java/com/android/tools/lint/checks/TooManyViewsDetector.java
1번 경우인 단일 XML에 View Element가 80개를 정의한 경우는 간혹(?) 존재합니다. 저의 경험에서는 단일 XML에서 레이아웃의 깊이는 10-Depth까지 사용하는 경우는 없는 것 같습니다. 개인적인 경험으로는 5~6 Depth를 넘어가면 Frame 부족으로 흔한 버벅대는 현상을 경험합니다.
만약 버벅대는? 현상을 경험한다면 Android 개발에서는 아래의 케이스를 의심할 수 있습니다.
- 메인 스레드에서 무거운(?) 작업
- 레이아웃 깊이가 깊음
- GPU Overdraw가 많음
레이아웃 깊이를 해결하는 방법은 다양하게 있습니다.
- 레이아웃 구조 수정
- ConstraintLayout으로 깊이 수정
- CustomView 수정
- 디자인 수정
이 글에서는 CustomView의 레이아웃 깊이를 줄이는 방법을 살펴볼 예정입니다.
매우 간단한 CustomView 작업
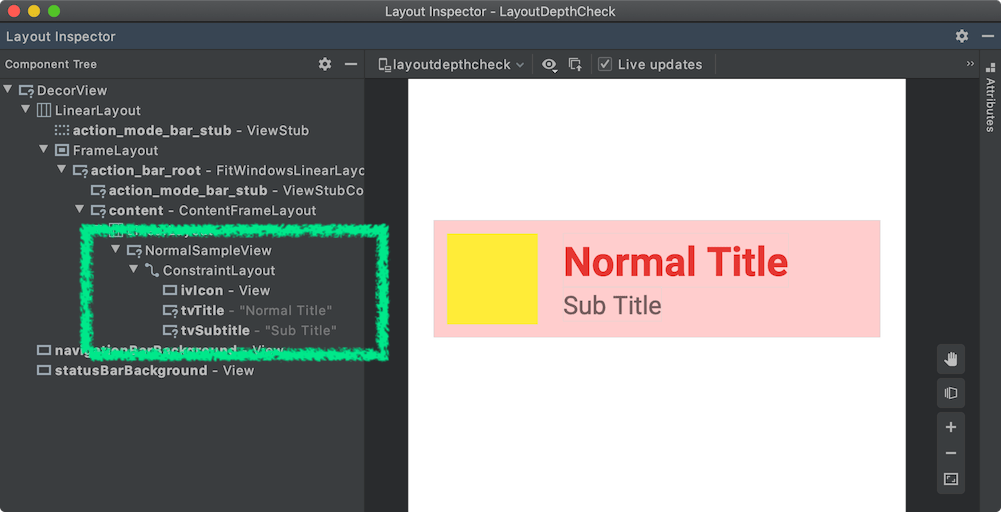
이번에 테스트할 내용은 아래와 같은 View입니다.

LinearLayout만 사용한다면 몇 개의 깊이가 될 것이라는 걸 쉽게 떠올릴 겁니다.
<LinearLayout>
  <View />
  <LinearLayout>
    <TextView />
    <TextView />
  </LinearLayout>
</LinearLayout>
위 예로는 2-level의 깊이로 구현되었습니다.
만약 ConstraintLayout이라면 아래와 같이 구현될 것입니다.
<androidx.constraintlayout.widget.ConstraintLayout>
  <View />
  <TextView />
  <TextView />
</androidx.constraintlayout.widget.ConstraintLayout>
일반적인 방법
흔하게 사용하는 방법은 아래와 같습니다. 아래의 레이아웃을 보더라도 기존에 작성하던 레이아웃 방식과 다르지 않습니다.
<androidx.constraintlayout.widget.ConstraintLayout ...
    android:layout_width="match_parent"
    android:layout_height="match_parent"
    android:padding="10dp">
    <View
        android:id="@+id/ivIcon"
        ...
        app:layout_constraintStart_toStartOf="parent"
        app:layout_constraintTop_toTopOf="parent" />

    <TextView
        android:id="@+id/tvTitle"
        ...
        app:layout_constraintStart_toEndOf="@id/ivIcon"
        app:layout_constraintTop_toTopOf="parent" />

    <TextView
        android:id="@+id/tvSubtitle"
        ...
        app:layout_constraintStart_toStartOf="@id/tvTitle"
        app:layout_constraintTop_toBottomOf="@id/tvTitle" />
</androidx.constraintlayout.widget.ConstraintLayout>
정의한 Layout을 사용하는 것 또한 매우 간단합니다. 이 예제에서는 NormalSampleView 이름으로 정의했습니다.
class NormalSampleView @JvmOverloads constructor(
    context: Context,
    attrs: AttributeSet? = null,
    defStyleAttr: Int = 0
) : ConstraintLayout(context, attrs, defStyleAttr) {
    init {
        inflate(context, R.layout.widget_normal_sample, this)
    }
}
결과

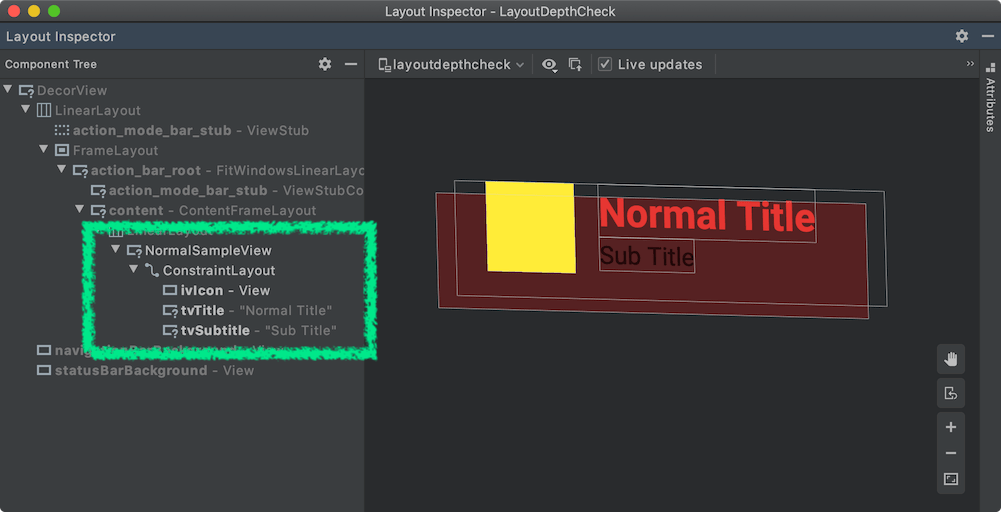
이렇게 사용하는 경우 위의 레이아웃 결과를 얻을 수 있습니다.
NormalSampleView
  ⎣ ConstraintLayout
    ⎣ Child Views
NormalSampleView 또한 ConstraintLayout으로 작성되었으므로, 실제로 2중 ConstraintLayout으로 NormalSampleView가 구성되어 있습니다. 또한, Layout Inspector의 Rotate View를 통해서도 해당 현상을 더 명확하게 확인할 수 있습니다.

일반적인 CustomView 동작의 원리
// LayoutInflater.java
public abstract class LayoutInflater {
  public View inflate(@LayoutRes int resource, @Nullable ViewGroup root) {
    return inflate(resource, root, root != null);
  }

  public View inflate(XmlPullParser parser, @Nullable ViewGroup root, boolean attachToRoot) {
    synchronized (mConstructorArgs) {
      ...
      try {
        ...
        if (TAG_MERGE.equals(name)) {
          ...
        } else {
          // Temp is the root view that was found in the xml
          final View temp = createViewFromTag(root, name, inflaterContext, attrs);
          ...
          // Inflate all children under temp against its context.
          rInflateChildren(parser, temp, attrs, true);
          ...
          // We are supposed to attach all the views we found (int temp)
          // to root. Do that now.
          if (root != null && attachToRoot) {
            root.addView(temp, params);
          }
          ...
        }
      } catch (XmlPullParserException e) {
        ...
      } catch (Exception e) {
        ...
      } finally {
        ...
      }
      return result;
    }
  }
}
출처 : https://android.googlesource.com/platform/frameworks/base/+/master/core/java/android/view/LayoutInflater.java#626
inflate(context, R.layout.widget_normal_sample, this)를 호출한 함수는 최종적으로 LayoutInflater#inflate(XmlPullParser, ViewGroup, boolean) 함수를 호출합니다.
LayoutInflater#inflate(XmlPullParser, ViewGroup, boolean) 함수로 전달되는 parameter의 실제 내용은 아래와 같습니다.
- XmlPullParser : XmlBlock$Parser
- ViewGroup : NormalSampleView
- boolean attachToRoot : true
inflate 내부에서 merge tag를 사용하지 않는 경우 아래와 같은 처리를 합니다.
- 임시 View 생성 : final View temp = createViewFromTag(root, name, inflaterContext, attrs)
- 자식 뷰들을 생성 : rInflateChildren(parser, temp, attrs, true);
- root view에 임시 View를 추가 : root.addView(temp, params);
이 경우에는 LayoutInflater#inflate 내부의 과정에서 include와 유사한 형태로 적용됩니다. 그렇기에 레이아웃 깊이가 1-depth 많습니다.
이 1-depth는 merge tag를 사용해서 줄일 수 있습니다. 이어서 확인해보겠습니다.
Merge 방식
기존 CustomView에서 inflate할 XML의 Root는 ConstraintLayout였습니다. merge 방식에서는 merge tag로 root를 선언합니다. 해당 화면이 호출하는 곳이 ConstraintLayout이라는 것을 Preview에 알리기 위해서 parentTag를 사용합니다.
<merge ...
    tools:padding="10dp"
    tools:parentTag="androidx.constraintlayout.widget.ConstraintLayout">
    <View
        android:id="@+id/ivIcon"
        ...
        app:layout_constraintStart_toStartOf="parent"
        app:layout_constraintTop_toTopOf="parent" />

    <TextView
        android:id="@+id/tvTitle"
        ...
        app:layout_constraintStart_toEndOf="@id/ivIcon"
        app:layout_constraintTop_toTopOf="parent" />

    <TextView
        android:id="@+id/tvSubtitle"
        ...
        app:layout_constraintStart_toStartOf="@id/tvTitle"
        app:layout_constraintTop_toBottomOf="@id/tvTitle" />
</merge>
merge tag를 사용한 Layout을 사용한 예제를 MergeSampleView에서 사용합니다.
class MergeSampleView @JvmOverloads constructor(
    context: Context,
    attrs: AttributeSet? = null,
    defStyleAttr: Int = 0
) : ConstraintLayout(context, attrs, defStyleAttr) {
    init {
        inflate(context, R.layout.widget_merge_sample, this)
        setPadding(25)
    }
}
기존 방식에서는 Root Layout에 padding을 정의할 수 있었습니다. 그러나 merge된 레이아웃에는 padding을 처리를 레이아웃에서 불가능하므로 코드로 대응합니다.
결과

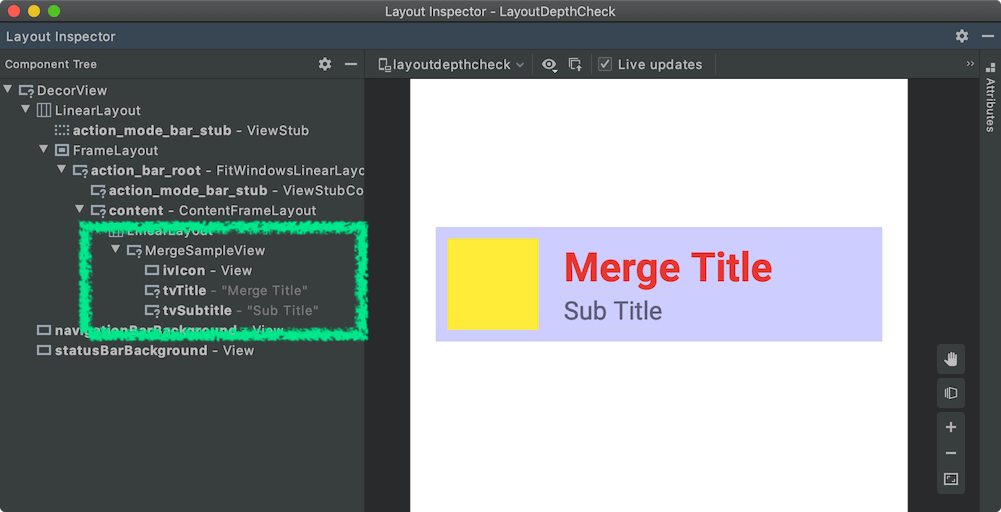
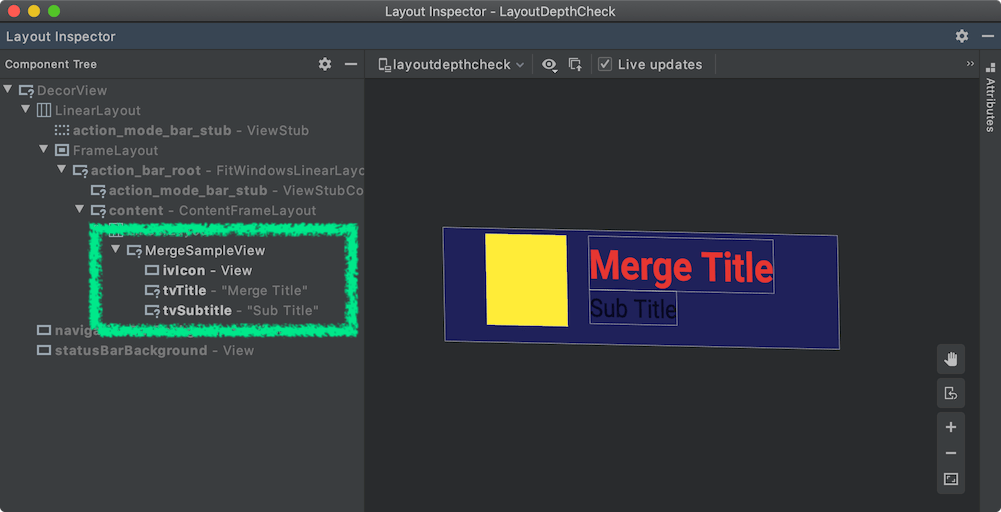
MergeSampleView는 기존 방법과는 다르게 1-depth가 적은 결과를 얻었습니다. Layout Inspector의 Rotate View를 통해서도 깊이를 확인할 수 있습니다.

merge의 CustomView 동작의 원리
merge tag 또한 기존 방식과 유사하게 LayoutInflater#inflate 호출합니다.
public abstract class LayoutInflater {
  public View inflate(XmlPullParser parser, @Nullable ViewGroup root, boolean attachToRoot) {
    synchronized (mConstructorArgs) {
      ...
      try {
        ...
        if (TAG_MERGE.equals(name)) {
          if (root == null || !attachToRoot) {
            throw new InflateException("<merge /> can be used only with a valid "
                                       + "ViewGroup root and attachToRoot=true");
          }
          rInflate(parser, root, inflaterContext, attrs, false);
        } else {
          ...
        }
      } catch (XmlPullParserException e) {
        ...
      } catch (Exception e) {
        ...
      } finally {
        ...
      }
      return result;
    }
  }
}
출처 : https://android.googlesource.com/platform/frameworks/base/+/master/core/java/android/view/LayoutInflater.java#626
inflate(context, R.layout.widget_merge_sample, this)를 호출한 함수는 최종적으로 LayoutInflater#inflate(XmlPullParser, ViewGroup, boolean) 함수를 호출합니다.
merge가 아닌 형태와 다른 부분은 임시 root를 만들지 않고, root에 직접 child view를 추가한다는 점입니다.
또한, merge tag를 사용한 경우 root가 null이거나 root에 attach 되지 않은 경우라면 InflateException 에러를 발생합니다.
Summary
지금까지 CustomView에서 1-depth 레이아웃을 깎는 방법을 간단하게 살펴봤습니다. 사실 이 내용은 꽤 오래전부터 사용되던 방법입니다.
이 방식을 사용하더라도 큰 폭으로 레이아웃 퍼포먼스가 개선되지는 않습니다. 작업량에 비해서 얻는 효과는 적은 편입니다.
또한 merge 레이아웃을 호출한 ViewGroup의 Layout 속성을 초기화 처리하기 위해서는 코드로 직접 정의해야 하는 불편함을 감수해야 하는 부분은 아쉬운 포인트입니다.
퍼포먼스 개선은 레이아웃, GPU, 디자인 등 다양한 작업을 통해 전체적인 빠른 UI를 얻을 수 있습니다.
아주 작은 개선이지만 조금씩 퍼포먼스가 좋아지길 기대하면서 글을 작성했습니다.
Currnte Pages Tags
Subscribe
Subscribe to this blog via RSS.
Categories
Recent Posts
- Posted on 30 Dec 2025
- Posted on 11 Oct 2025
- Posted on 27 Aug 2025
-
[발표자료] Google I/O Extended Incheon 2025 ~ What's new in Android development tools
Posted on 16 Aug 2025