UI Code Snippet용 Plugin 제작기 ~ 1부 : ToolWindow/Configurable
- 0부 : 서론
- 1부 : ToolWindow/Configurable <- 현재 글
- 2부 : ActionButton/JList
- 3부 : Import
- 4부 : 기타 기능
사전 조건
기본적인 Plugin 작업 시 IntelliJ에서 제공하는 IntelliJ Platform Plugin Template을 사용하시면 됩니다.
우리가 만들어볼 Plugin의 일부 모습입니다.
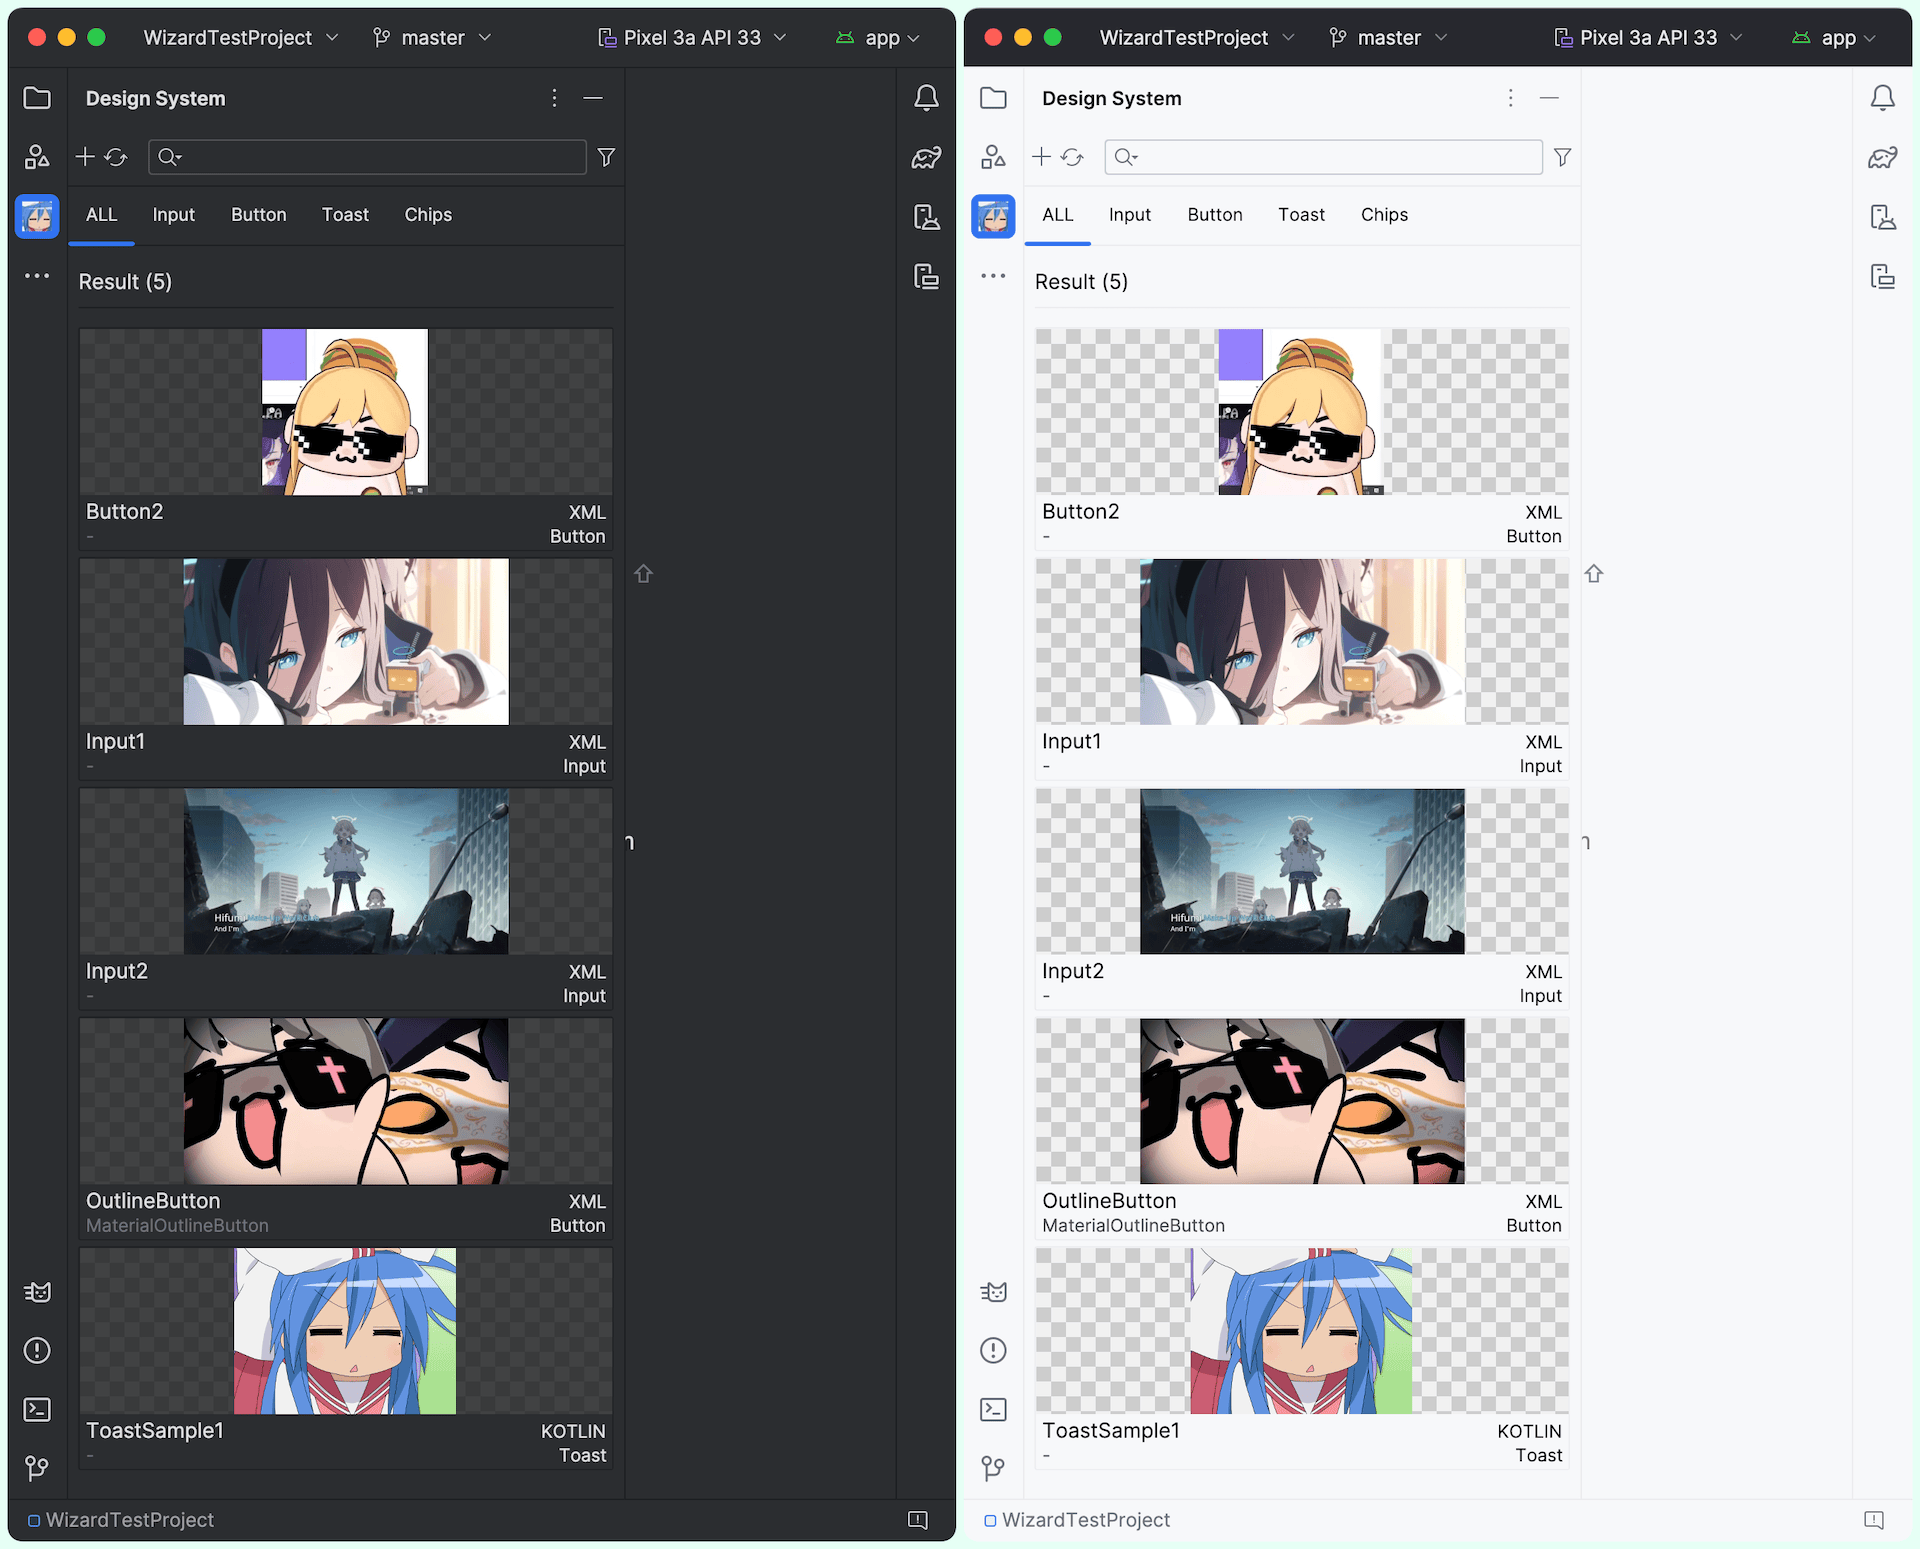
위 모습에는 아래의 컴포넌트들이 사용되었습니다.
- 왼쪽에 존재하는 도구 창 -> Tool Window
- 창 상단의 메뉴 (Add/Refresh/Search/Filter) -> ActionButton/SearchTextField
- 검색 결과 -> JBLabel
- 리스트 결과 -> JList
- 이미지 정보 -> ImageIcon
- 설정 정보 -> Configurable
Tool Window
Android Studio 혹은 Intellij 계열 IDE를 사용해 본 개발자라면 별도 창에 노출된 메뉴는 자주 접하는 화면입니다. IntelliJ에서는 해당 컴포넌트가 Tool Windows입니다
Tool Windows 문서 : https://plugins.jetbrains.com/docs/intellij/tool-windows.html
Tool Window 샘플 : https://github.com/JetBrains/intellij-sdk-code-samples/tree/main/tool_window
(1) Tool Windows 설정
Tool Windows를 정의하기 위해서는 먼저, plugin.xml 구성 파일에 추가하려는 Tools Windows을 정의합니다.
<idea-plugin>
   <extensions defaultExtensionNs="com.intellij">
      <library.toolWindow
         id="Design System"
         anchor="left"
         icon="Icon 정의"
         factoryClass="com.pluu.plugin.toolWindow.designsystem.DesignSystemToolWindowFactory"/>
   </extensions>
</idea-plugin>
library.toolWindow에서 정의된 속성은 다음과 같습니다.
- id : Tool Window의 ID
- anchor : Tool Window가 노출될 위치 (left/right/bottom)
- factoryClass : ToolWindowFactory를 구현할 클래스
class DesignSystemToolWindowFactory : ToolWindowFactory {
   override fun createToolWindowContent(project: Project, toolWindow: ToolWindow) {
      // Create Content
   }
}
다음으로 ToolWindowFactory#createToolWindowContent 함수를 사용해 Tool Window 위에 그려질 컨텐츠를 정의합니다.
(2) Tool Windows 노출 옵션 처리
Tool Windows를 사용하더라도 상황에 따라서 사용 여부를 선택적으로 하고 싶은 경우도 있습니다.
기본적으로 ToolWindowFactory#isApplicable 함수의 리턴값으로 true/false를 전달하여 노출 여부를 선택할 수 있습니다.
class DesignSystemToolWindowFactory : ToolWindowFactory {
   override fun isApplicable(project: Project): Boolean {
      return /** 노출 여부 */
   }
}
Tool Windows > Conditional Display : https://plugins.jetbrains.com/docs/intellij/tool-windows.html#conditional-display
다만, ToolWindowFactory#isApplicable은 프로젝트가 로드될 때 한번만 체크합니다. 그러므로 동적으로 노출 여부를 선택하려면 다른 방식으로 해야 합니다.
샘플에서는 Tool Windows 노출 여부를 Setting에서 노출 여부를 처리하도록 해보겠습니다.
Settings Configurable 설정
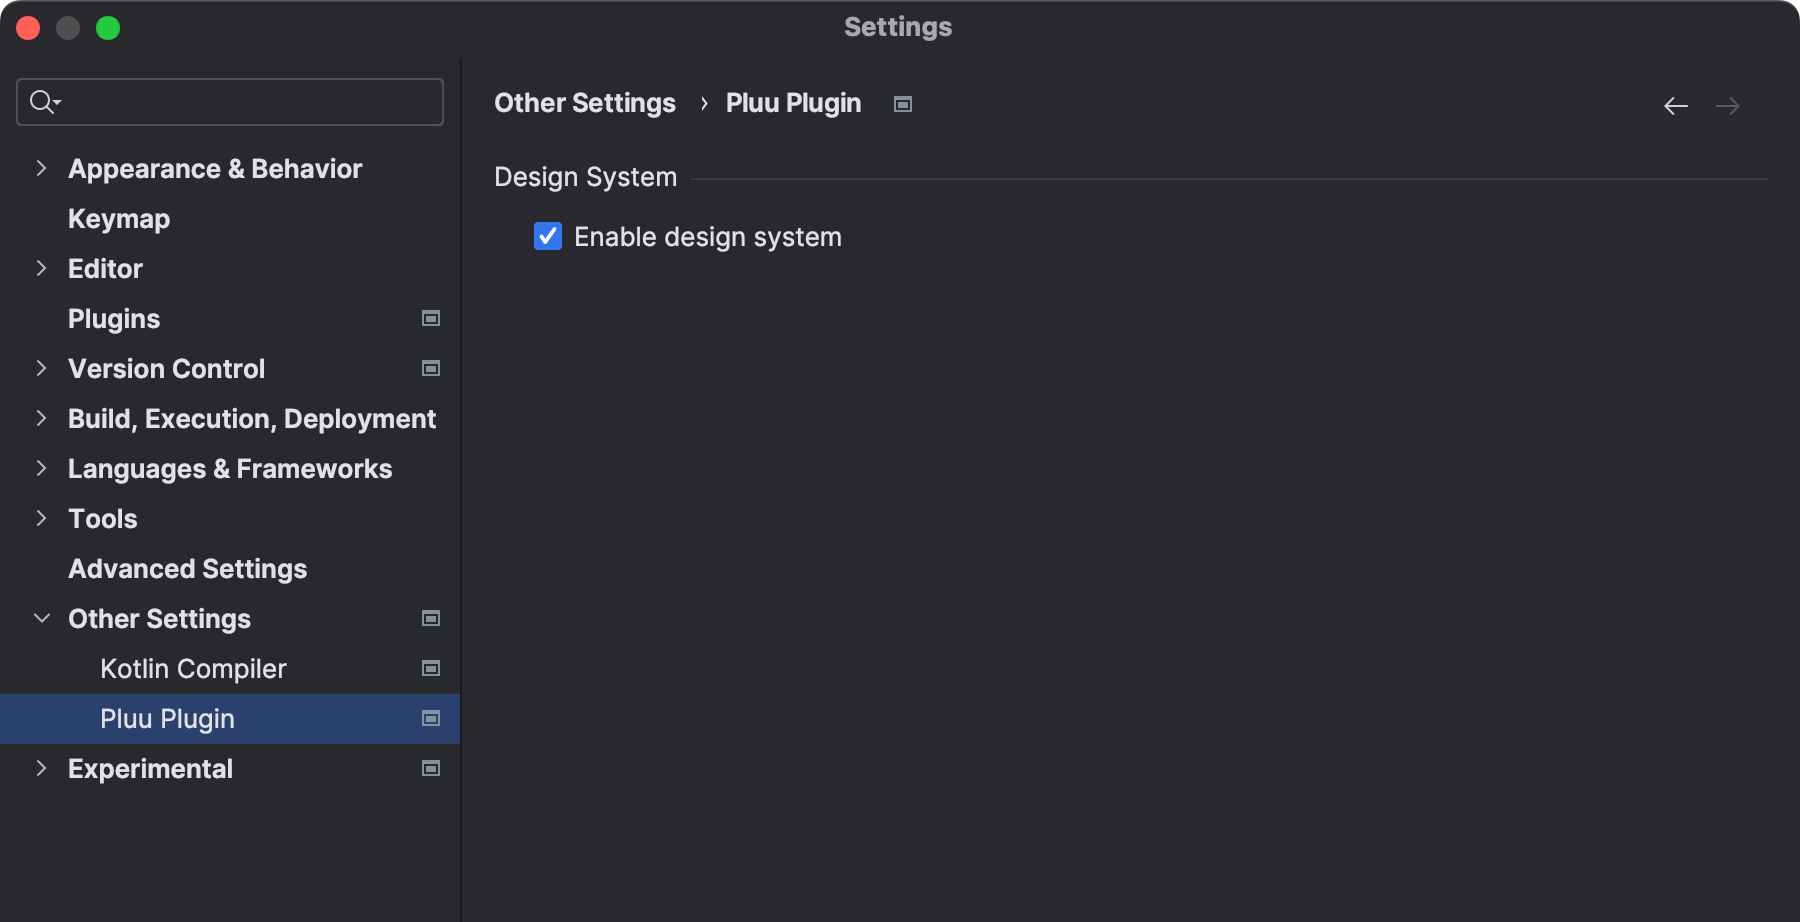
Settings 하위에 자신만의 설정을 정의할 수 있습니다. 이번 글에서는 Settings > Other Settings에 Pluu Plugin이라는 항목을 추가하고 Tool Windows 노출 여부를 선택할 수 있도록 만들 예정입니다.
(1) 상태 클래스 설정
Settings에서 UI를 만들기 전에 Tool Windows 노출 여부 상태를 보관하는 처리부터 하겠습니다. IntelliJ Plugin SDK에서는 상태 저장을 위해서 PersistantStateComponent 인터페이스를 제공하고 있습니다.
Persisting State of Components : https://plugins.jetbrains.com/docs/intellij/persisting-state-of-components.html
샘플에서는 PersistantStateComponent를 더 쉽게 사용할 수 있는 SimplePersistentStateComponent를 사용하겠습니다. 더불어 BaseState 클래스를 사용해 기본값 등 프로퍼티를 쉽게 생성할 수 있습니다.
추후 ConfigSettings.State에 정의한 isDesignSystemEnable를 사용하여 Tool Windows 노출 여부에 사용할 예정입니다.
@State(
   name = "ConfigSettings",
   storages = [Storage("PluuPlugin.xml")]
)
class ConfigSettings : SimplePersistentStateComponent<ConfigSettings.State>(State()) {
   class State : BaseState() {
      var isDesignSystemEnable: Boolean by property(true)
   }

   companion object {
      fun getInstance(): ConfigSettings =
         ApplicationManager.getApplication().service<ConfigSettings>()
   }
}
이어서 plugin.xml에도 applicationService로 등록합니다.
<!-- plugin.xml -->
<idea-plugin>
   <extensions defaultExtensionNs="com.intellij">
      <applicationService
            serviceImplementation="com.pluu.plugin.settings.ConfigSettings"/>
   </extensions>
</idea-plugin>
(2) Settings에 Component 추가
Configurable
상태 클래스를 UI로 표현할 차례입니다. IntelliJ에서 Settings에 노출하기 위해서는 plugin.xml 파일에 Configurable 정의를 추가해야 합니다. IDE 전역에 필요한 applicationConfigurable과 프로젝트 단위로 사용될 projectConfigurable이 있지만, 샘플에서는 applicationConfigurable를 사용하겠습니다.
<!-- plugin.xml -->
<idea-plugin>
   <extensions defaultExtensionNs="com.intellij">
      <!-- IDE 전역에 허용할 설정 -->
      <applicationConfigurable
            id="com.pluu.plugin.settings.ConfigConfigurable"
            instance="com.pluu.plugin.settings.ConfigConfigurable"/>

      <!-- 프로젝트 단위로 허용할 설정 -->
      <projectConfigurable
            id="..."
            instance="..."/>
   </extensions>
</idea-plugin>
Settings 가이드 문서 : https://plugins.jetbrains.com/docs/intellij/settings-guide.html#declaring-application-settings
Setting 샘플 : https://github.com/JetBrains/intellij-sdk-code-samples/tree/main/settings
Configurable 인터페이스의 구현체에서는 실제 UI와 Settings에서 요구되는 기능을 구현하면 됩니다.
- createComponent() : Settings에 노출할 UI 컴포넌트 반환
- isModified()/apply()/reset() : 설정의 변경에 대한 기능
class ConfigConfigurable(
   private val project: Project
) : Configurable {

   // Singleton 데이터 취득
   private val configSettings = ConfigSettings.getInstance()
   // Settings에 노출할 UI Component
   private lateinit var configComponent: ConfigComponent

   override fun createComponent(): JComponent? {
      // 사용자에게 노출할 Component
      configComponent = ConfigComponent(project, configSettings)
      return configComponent.root
   }

   override fun isModified(): Boolean {
      /** 마지막 상태로부터 변경이 발생했는지 여부 */
      return configComponent.isModified()
   }

   override fun apply() {
      /** 현재 상태를 반영 */
      return configComponent.apply()
   }

   override fun reset() {
      /** 마지막 저장 상태로 초기화 */
      return configComponent.reset()
   }

   // Settings에 노출할 Title
   override fun getDisplayName(): String = "Pluu Plugin"
}
ConfigComponent
샘플에서는 Group과 CheckBox만 존재하는 기본 기능만 대응했습니다. IntelliJ의 UI는 Swing을 사용해야 하며, 여기에서는 UI 컴포넌트로 Kotlin UI DSL Version 2를 사용했습니다.
Kotlin UI DSL Version 2 : https://plugins.jetbrains.com/docs/intellij/kotlin-ui-dsl-version-2.html#ui-dsl-basics
class ConfigComponent(
   private val configSettings: ConfigSettings
) {
   val root: JPanel

   private lateinit var designSystemStatus: JBCheckBox

   init {
      root = panel {
         group("Design System") {
            row {
               designSystemStatus = checkBox("Enable design system").component
            }
         }
      }
   }

   fun isModified(): Boolean {
      return configSettings.isDesignSystemEnable != designSystemStatus.isSelected
   }

   fun apply() {
      configSettings.isDesignSystemEnable = designSystemStatus.isSelected
   }

   fun reset() {
      designSystemStatus.isSelected = configSettings.isDesignSystemEnable
   }
}
(3) Tool Windows 노출 여부 연결
앞서 선언한 Tool Windows를 구성하는 ToolWindowFactory에서 상태 저장용 ConfigSettings 클래스를 사용해 Tool Windows 노출 여부를 작성해 보겠습니다.
class DesignSystemToolWindowFactory : ToolWindowFactory {
   override fun isApplicable(project: Project): Boolean {
      // 프로젝트 로드 시 한 번만 검증
      return ConfigSettings.getInstance().isDesignSystemEnable
   }

   override fun createToolWindowContent(project: Project, toolWindow: ToolWindow) {
      project.messageBus.connect(project)
         .subscribe(ToolWindowManagerListener.TOPIC,
            object : ToolWindowManagerListener {
               override fun stateChanged(toolWindowManager: ToolWindowManager) {
                  super.stateChanged(toolWindowManager)
                  val toolWindow = toolWindowManager.getToolWindow("Design System") ?: return
                  toolWindow.isAvailable = ConfigSettings.getInstance().isDesignSystemEnable
               }
            })
   }
}
참고로 ToolWindowManagerListener를 통해서 상태 변경이 일어났을 때마다 체크하는 코드가 샘플로 사용되었습니다.
다만, 처음 isApplicable 호출의 리턴이 false인 경우에는 이후로 ToolWindow가 노출된 적이 없으므로 ToolWindowManagerListener의 응답이 호출되지 않습니다.
다음 글에서는 List와 항목 노출에 대한 내용을 다룰 예정입니다.
Currnte Pages Tags
Subscribe
Subscribe to this blog via RSS.
Categories
Recent Posts
- Posted on 08 Jun 2026
- Posted on 19 Apr 2026
- Posted on 15 Mar 2026
- Posted on 10 Mar 2026